It's impossible to imagine a smartphone presentation today without dancing around its camera. Google makes Pixel shoot in the dark, Huawei zooms like a telescope, Samsung puts lidars inside, and Apple presents the new world's roundest corners. Illegal level of innovations happening here.
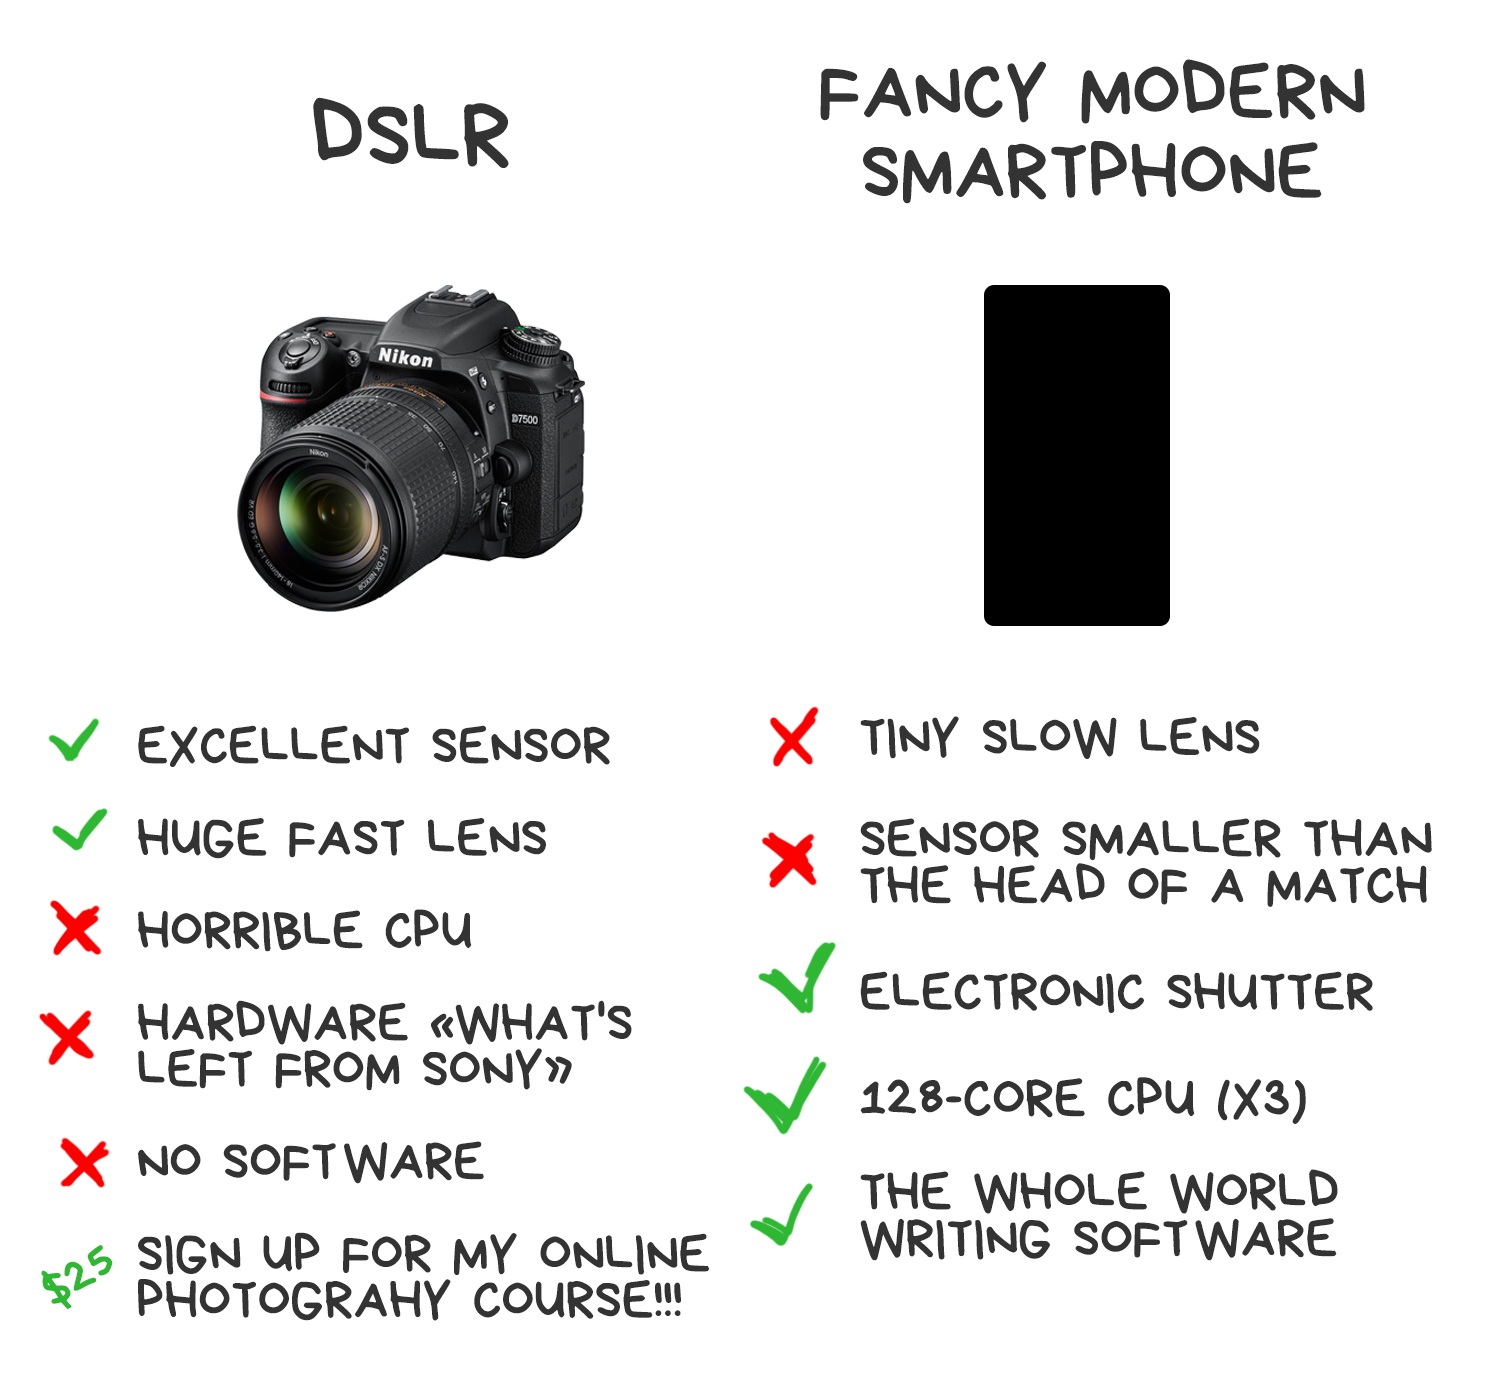
DSLRs, on the other hand, seems half dead. Sony showers everybody with a new sensor-megapixel rain every year, while manufacturers lazily update the minor version number and keep lying on piles of cash from movie makers.
I have a $3000 Nikon on my desk, but I take an iPhone on my travels. Why?
I went online with this question. There, I saw a lot of debates about "algorithms" and "neural networks", though no one could explain how exactly they affect a photo. Journalists are loudly reading the number of megapixels from press releases, bloggers are shitting down the Internet with more unboxings, and the camera-nerds are overflowing it with "sensual perception of the sensor color palette". Ah, Internet. You gave us access to all the information. Love you.
Thus, I spent half of my life to understand the whole thing on my own. I'll try to explain everything I found in this article, otherwise I'll forget it in a month.
Everywhere, including wikipedia, you get a definition like this: computational photography is a digital image capture and processing techniques that use digital computation instead of optical processes. Everything is fine with it except that's bullshit. It includes even an autofocus, but not plenoptic, which has already brought a lot of good stuff to us. The fuzziness of the official definitions kinda indicates that we still have no idea what are we doing.
Stanford Professor and pioneer of computational photography Marc Levoy (he's also in charge of Google Pixel's camera now) gives another definition — computational imaging techniques that enhance or extend the capabilities of digital photography in which the output is an ordinary photograph, but one that could not have been taken by a traditional camera. I like it more, and in the article, I will follow this definition.
So, the smartphones were to blame for everything.
Smartphones had no choice but to give life to a new kind of photography — computational
They had little noisy sensors and tiny slow lenses. According to all the laws of physics, they could only bring us pain and suffering. And they did. Until some devs figured out how to use their strengths to overcome the weaknesses: fast electronic shutters, powerful processors, and software.
Most of the significant research in computational photography field was done in 2005-2015, that counts yesterday in science. Means, right now, just in front of our eyes and inside our pockets, there's a new field of knowledge and technology is rising, that never existed before.

Computational photography isn't just about the bokeh on selfies. A recent photograph of a black hole would not have been taken without using computational photography methods. To take such picture with a standard telescope, we would have to make it the size of the Earth. However, by combining the data of eight radio telescopes at different locations of our Earth-ball and writing some cool Python scripts, we got the world's first picture of the event horizon.
It's still good for selfies though, don't worry.
📝 Computational Photography: Principles and Practice
📝 Marc Levoy: New Techniques in Computational photography
I'm going to insert such links in the course of the story. They will lead you to the rare brilliant articles 📝 or videos 🎥, that I found, and allow you to dive deeper into the topic if you suddenly became interested. Because I physically can't tell you everything in one blog post.
Let's get back to 2010. Justin Bieber released his first album, Burj Khalifa just opened in Dubai, but we couldn't even capture these two great universe events, because our photos were noisy 2-megapixel JPEGs. We got the first irresistible desire to hide the worthlessness of mobile cameras by using "vintage" presets. Instagram cames out.

With the release of Instagram, everyone got obsessed with filters. As the man who reverse engineered the X-Pro II, Lo-Fi, and Valencia for, of course, research (hehe) purposes, I still remember that they comprised three components:


Modern filters have not gone far from these three, but have become a little more complicated from the math perspective. With the advent of hardware shaders and OpenCL on smartphones, they were quickly rewritten under the GPU, and it was considered insanely cool. For 2012, of course. Today any kid can do the same thing on CSS, but he still won't invite a girl to prom.
However, the progress in the area of filters has not stopped there. Guys from Dehanсer, for example, are getting very hands-on with non-linear filters. Instead of poor-human tone-mapping, they use more posh and complex non-linear transformations, which opens up much more opportunities, according to them.
You can do a lot of things with non-linear transformations, but they are incredibly complex, and we humans are incredibly stupid. As soon as it comes to non-linear transformations, we prefer to go with numerical methods or run neural networks to do our job. The same thing happens here.
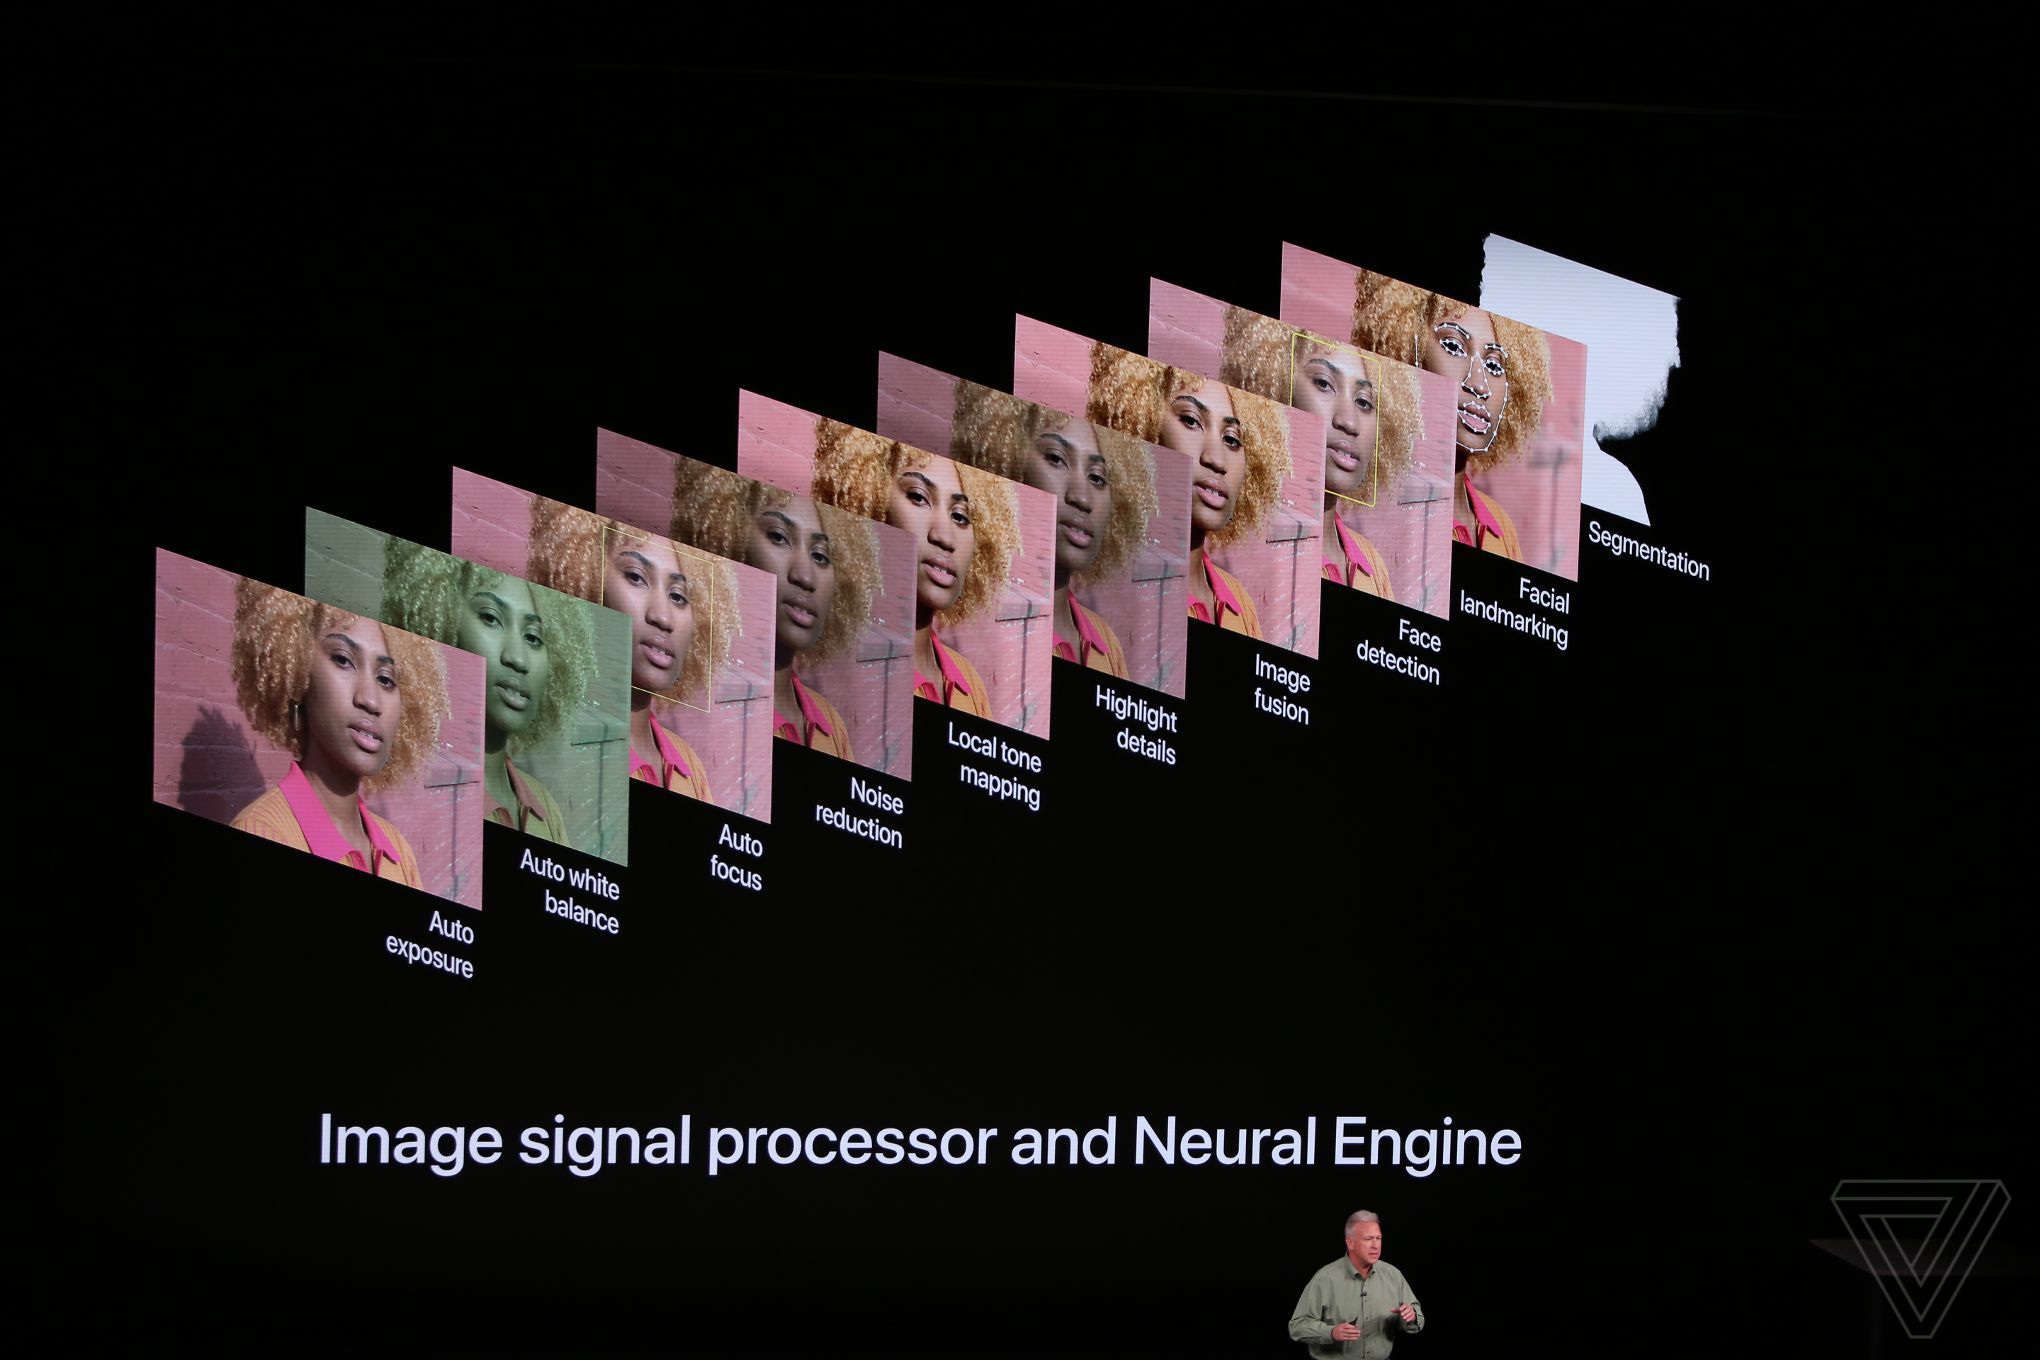
When everybody got used to filters, we started to integrate them right into our cameras. It's hidden in history whoever was the first manufacturer to implement this, but just to understand how long ago it was, think, that in iOS 5.0 released in 2011 we already had a public API for Auto Enhancing Images. Only Steve Jobs knows how long it was in use before it opened to the public.
The automation was doing the same thing that any of us does by opening the photo editor — it fixed the lights and shadows, increased the brightness, took away the red eyes, and fixed the face color. Users didn't even know that "dramatically improved camera" was just the merit of a couple of new lines of code.
Today, the battles for the Masterpiece button have moved to the machine learning field. Tired of playing with tone-mapping everyone rushed to the hype train CNN's and GAN's and started, forcing computers to move the sliders for us. In other words, to use an input image to determine a set of optimal parameters that will bring the given image closer to a particular subjective understanding of "good photography". Check out how it's implemented in Pixelmator Pro and other editors who's luring you with their fancy "ML" features stated on a landing page. It doesn't always work well, as you can guess. But you can always take the datasets and train your own network to beat these guys, using the links below. Or not.
📝 Image Enhancement Papers
📝 DSLR-Quality Photos on Mobile Devices with Deep Convolutional Networks
True computational photography began with stacking — a method of combining several photos on top of each other. It's not a big deal for a smartphone to shoot a dozen pics in half a second. There're no slow mechanical parts in their cameras: the aperture is fixed, and there is an electronic shutter instead of the "moving curtain". The processor simply tells the sensor how many microseconds it should catch the wild photons, and reads the result.
Technically, the phone can shoot photos at a speed of the video, and it can shoot video in a photo resolution, but all that is slowed down to the speed of the bus and processor. Therefore, there is always a software limitation.
Stacking has been with us for a while. Even the founders' fathers used plugins for Photoshop 7.0 to gather some crazy-sharpened HDR photos or to make a panorama of 18000x600 pixels, and… no one figured out what to do with them next. Good wild times.
Now, as grown-ups, we call it "epsilon photography", which means changing one of the camera parameters (exposure, focus, or position) and putting images together to get something that couldn't be captured in one shot. Although, in practice, we call it stacking. Nowadays, 90% of all mobile camera innovations are based on it.
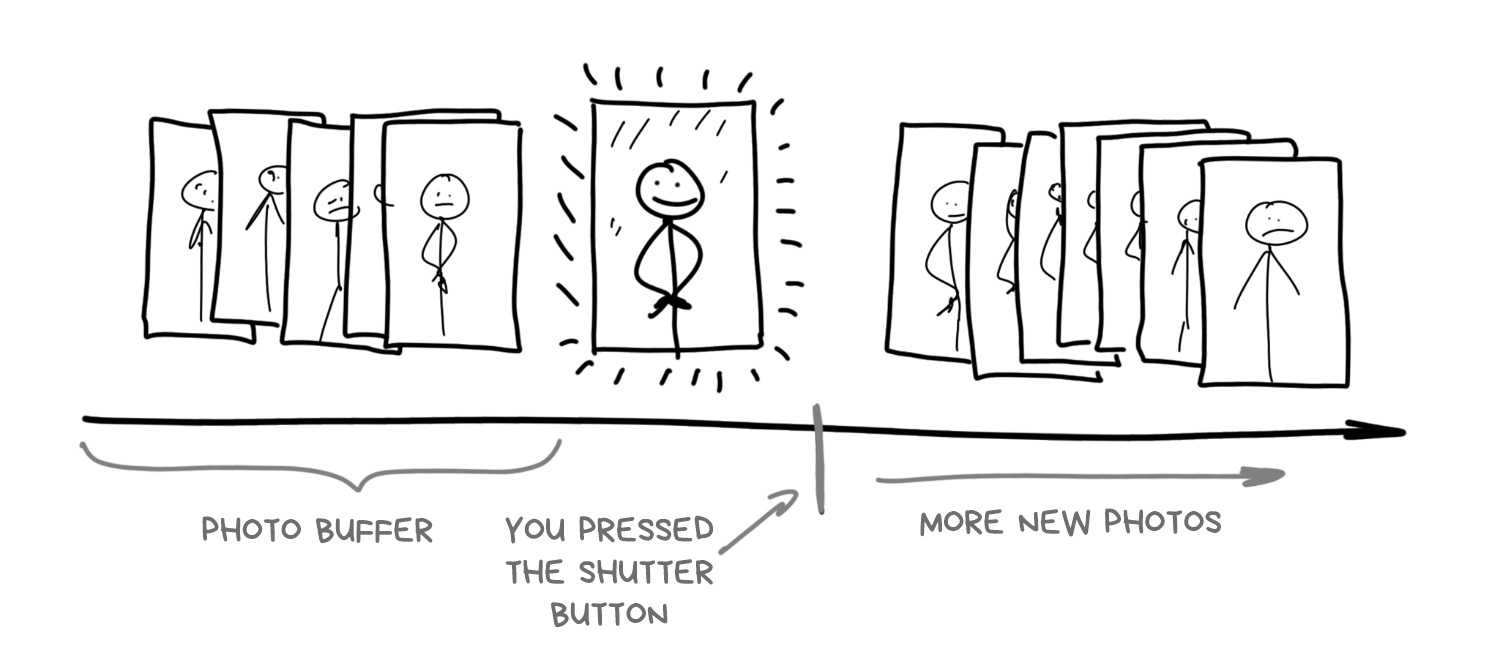
There's a thing many people don't care, but it's crucial for understanding the entire mobile photography: Modern smartphone camera starts taking photos as soon as you open it. Which is logical, since it should show the image on screen somehow. But in addition to that, it saves high-resolution images to its cyclic buffer and stores them for a couple more seconds. No, not only for NSA.
When you tap "take a photo" button, the photo has actually already been taken, and the camera is just using the last picture from the buffer
That's how any mobile camera works today. At least the top ones. Buffering allows implementing not only zero shutter lag, which photographers begged for so long, but even a negative one. By pressing the button, the smartphone looks in the past, unloads 5-10 last photos from the buffer and starts to analyze and combine them furiously. No longer need to wait till phone snaps shots for HDR or a night mode — let's simply pick them up from the buffer, the user won't even realize.
In fact, that's how Live Photo implemented in iPhones, and HTC had it back in 2013 under a strange name Zoe.

The old and hot topic is whether the camera sensors can capture the entire brightness range available to our eyes. Some people say no, as the eye can see up to 25 f-stops and even the top full-frame sensor can be stretched out to a maximum of 14. Others call the comparison incorrect, since our eyes are assisted by the brain, which automatically adjusts your pupils and completes the image with its neural networks. So the instantaneous dynamic range of the eye is actually no more than 10-14 f-stops. Too hard. Let's leave these disputes to scientists.
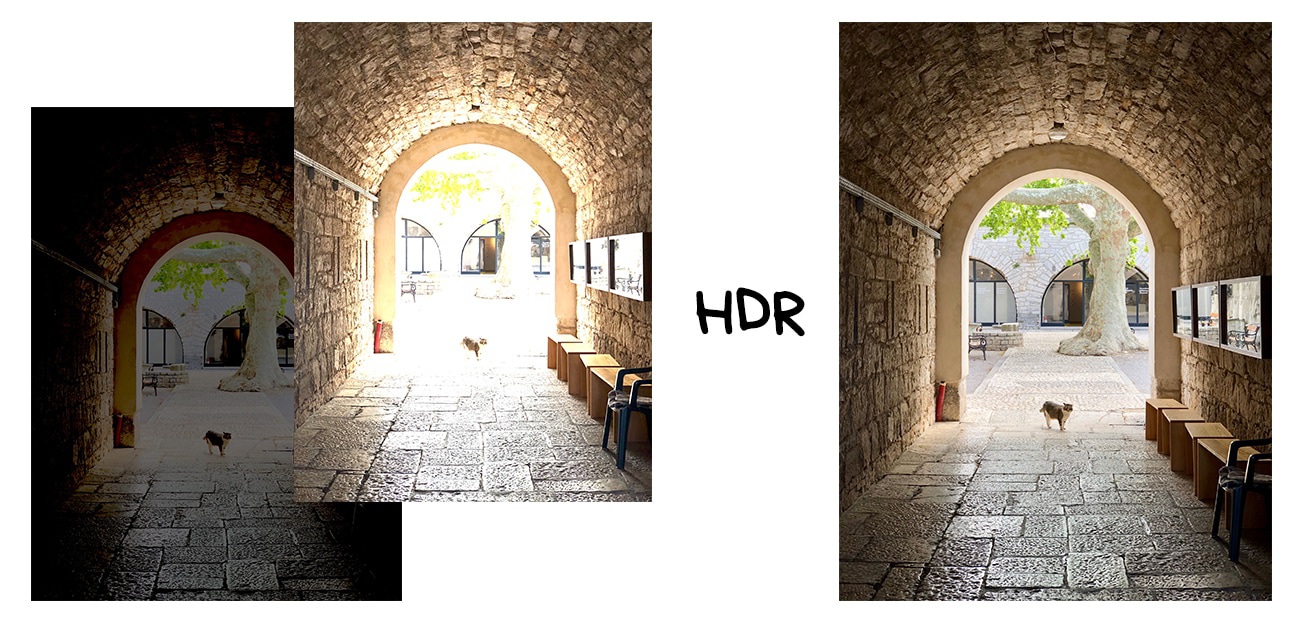
The fact remains — taking pictures of friends against a bright sky, without HDR, with any mobile camera, you get either a natural sky and dark faces of friends, or natural faces, but completely burned sky.
The solution was found a long time ago — to expand the brightness range using HDR (High-dynamic-range) process. When we can't get a wide range of brightness right away, we can do it in three steps (or more). We can shoot several pictures with different exposure — "normal" one, brighter, and darker one. Then we can fill in the shady spots using the bright photo, and restore overexposed spots from the dark one.
One last thing needs to be done here is solving the problem of automatic bracketing. How far do we shift the exposure of each photo so as not to overdo it? However, any second-year tech student can do it today using some Python libraries.
The latest iPhone, Pixel and Galaxy turn on HDR mode automatically when a simple algorithm inside their cameras detects you're shooting on a sunny day. You can even see how the phone switches to buffer mode to save shifted images — fps drops down, and the picture on the screen becomes juicier. That moment of switching is every time clearly visible on my iPhone X. Take a closer look at your smartphone next time.

The main disadvantage of HDR with exposure bracketing is its incredible uselessness in poor lighting. Even in the light of a home lamp, the images come out so dark that even the machine cannot level and stack them together. To solve the problem, Google announced a different approach to HDR in a Nexus smartphone back to 2013. It was using time stacking.

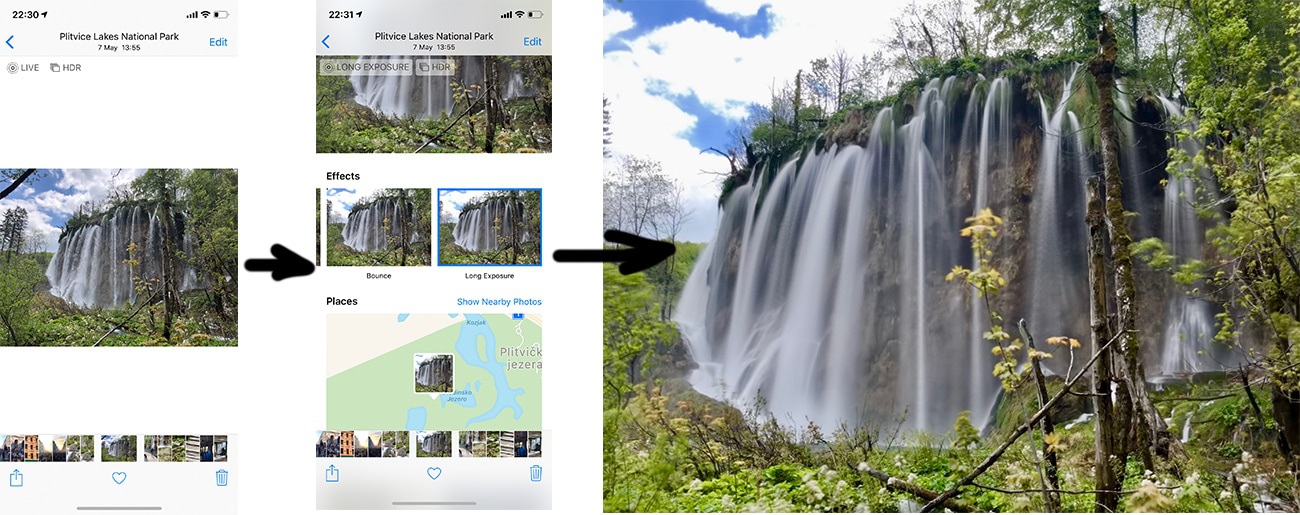
Time stacking allows you to get a long exposure look with a series of short shots. This approach pioneered by the guys, who liked to take pictures of star trails in the night sky. Even with a tripod, it was impossible to shot such pictures by opening the shutter once for two hours. You had to calculate all the settings beforehand, and the slightest shaking would spoil the whole shot. So they decided to divide the process into a few minute intervals and stack the pictures together later in Photoshop.

Thus, the camera never was shooting with a long exposure; we simulated the effect by combining several consecutive shots. Smartphones have a lot of apps using this trick for a long time, but now almost every manufacturer added it to standard camera tools.
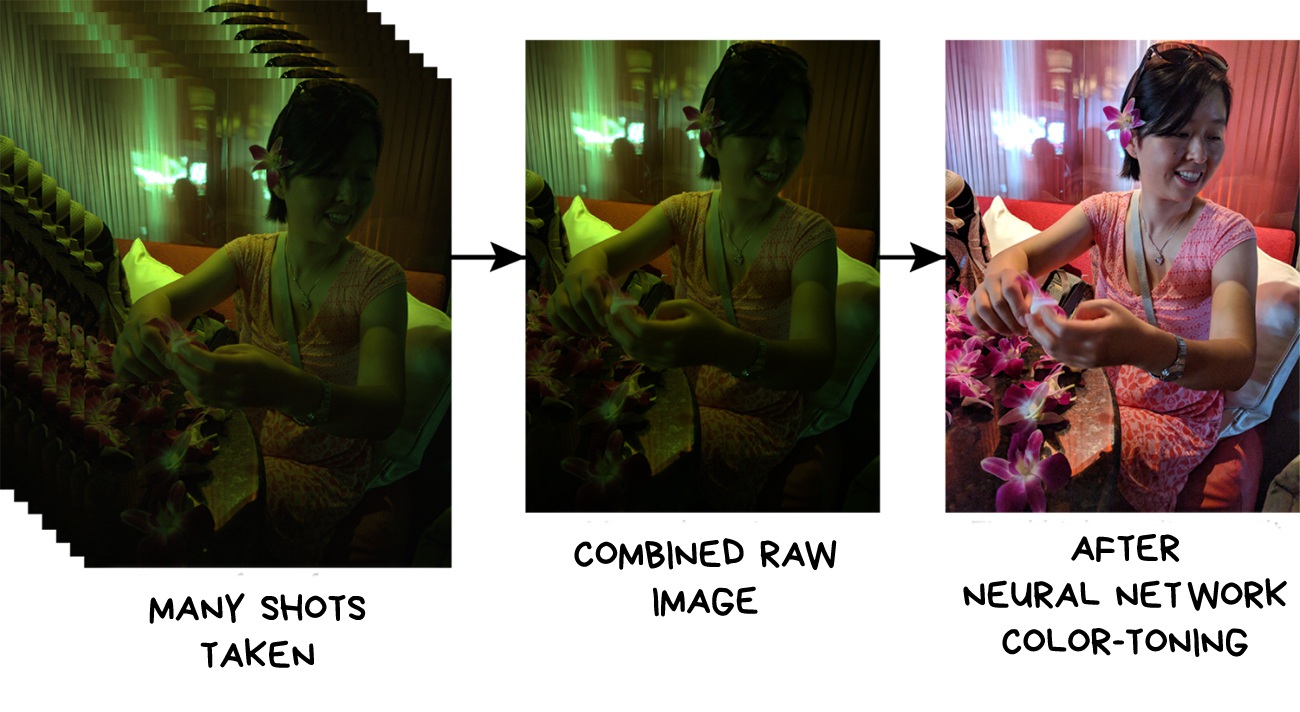
Let's get back to Google and its night-time HDR. It turned out that using time bracketing you can create a decent HDR in the dark. This technology appeared in Nexus 5 for the first time and was called HDR+. The technology is still so popular that it is even praised in the latest Pixel presentation.
HDR+ works quite simple: once the camera detects that you're shooting in the dark, it takes the last 8-15 RAW photos out of the buffer out and stacks them on top of each other. This way, the algorithm collects more information about the dark areas of the shot to minimize the noise — pixels, when due to some reasons the camera screwed up and failed to catch some photons on each particular frame.
Imagine that: you have no idea how capybara looks like, so you decided to ask five people about it. Their stories would be roughly the same, but each will mention any unique detail, and so you'd gather more information than if asking only one person. Same happens with pixels on photo. More information — more clarity and less noise.
📝 HDR+: Low Light and High Dynamic Range photography in the Google Camera App
Combining the images captured from the same point gives the same fake long exposure effect as in the example with the stars above. Exposure of dozens of pictures is summarized, and errors on one picture are minimized on the other. Imagine how many times you would have to slam the shutter in your DSLR to achieve this.

Only one thing left, and this is an automatic color casting. Shots taken in the dark usually have broken color balance (yellowish or greenish), so we need to fix it manually. In earlier versions of HDR+, the issue was resolved by simple auto-toning fix, à la Instagram filters. Later, they brought a neural network to the rescue.
That's how Night Sight was born — "the night photography" technology in Pixel 2, 3, and later. The description says "machine learning techniques built on top of HDR+ that make Night Sight work". In fact, it's just a fancy name for a neural network and all the HDR+ post-processing steps. The machine was trained on "before" and "after" dataset of photos to make one beautiful image out of a set of dark and dirty ones.
This dataset, by the way, was made public. Maybe Apple guys will take it and finally teach their "world-best cameras" to shoot in the dark?
Also, Night Sight calculates the motion vector of the objects in the shot to normalize the blurring, that's for sure will appear in a long exposure. Thus, the smartphone can take sharp parts from other shots and stack them.
📝 Night Sight: Seeing in the Dark on Pixel Phones
📝 Introducing the HDR+ Burst Photography Dataset

Panorama has always been a favorite kids toy. World's history knows no cases when a sausage photo was interesting to anyone but its author. However, it's still worth to talk about it though because that's how stacking got into many people's lives.

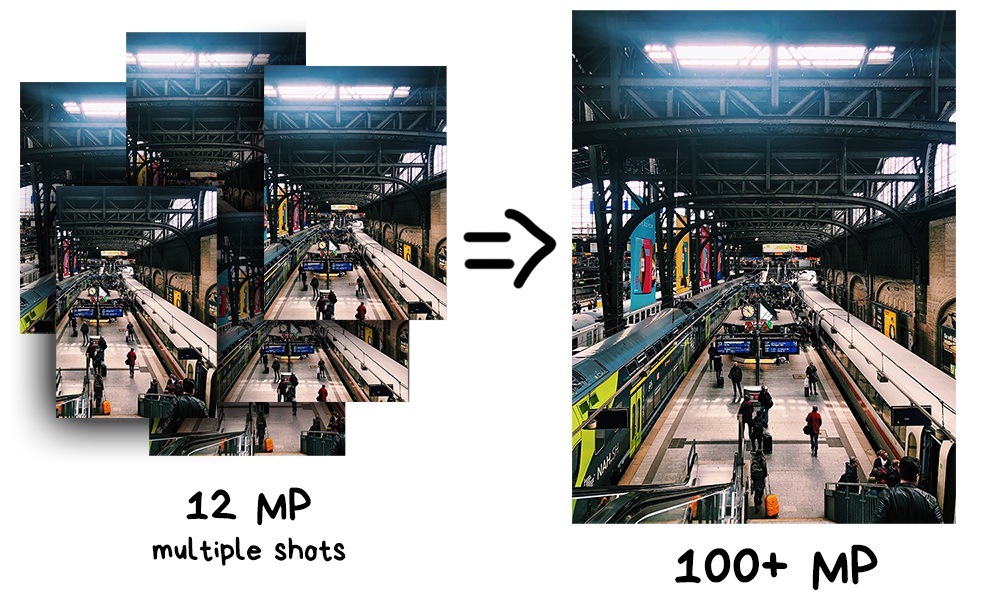
The very first useful application for panorama is making super-resolution photos. By combining multiple slightly shifted images, you can get a much higher resolution image than the camera provides. Thus you can receive a photo in hundreds of gigapixels resolution, which is very useful if you need to print it for a house-sized billboard.
📝 A Practical Guide to Creating Superresolution Photos with Photoshop
Another and more interesting approach called Pixel Shifting. Some mirrorless cameras like Sony and Olympus started supporting it in 2014, but they're still asking you to combine the result yourself. Typical DSLR innovations.
Smartphones have succeeded here for a hilarious reason. When you take a picture, your hands are shaking. This "problem" became the basis for the implementation of native super-resolution on smartphones.
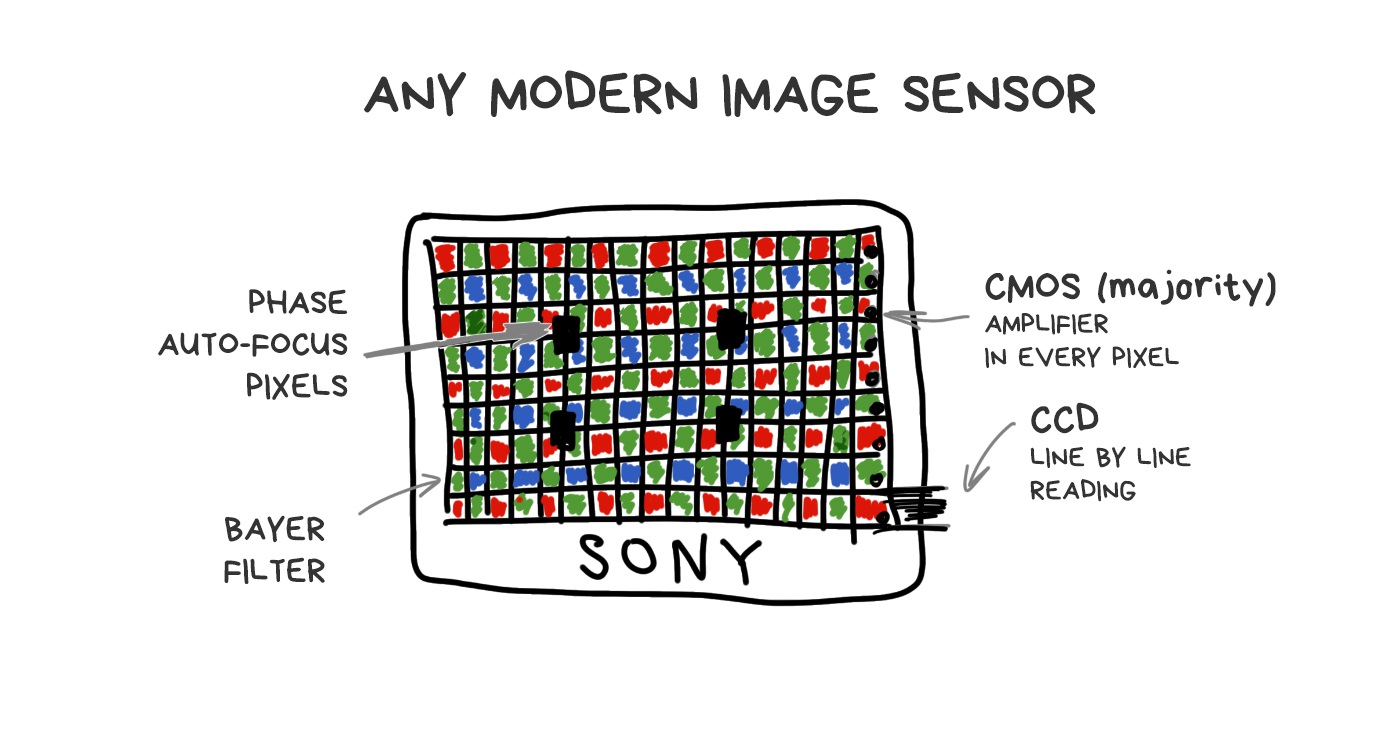
To understand how it works, we need to remember how any camera's sensor works. Each pixel (photodiode) can capture only the intensity of light, i.e., the number of photons which broke through. However, a pixel cannot measure the color (wavelength). In order to get an RGB-image, we had to hack it around and cover the whole sensor with a grid of multicolored glasses. Its most popular implementation is called Bayer filter and is used today in most sensors.
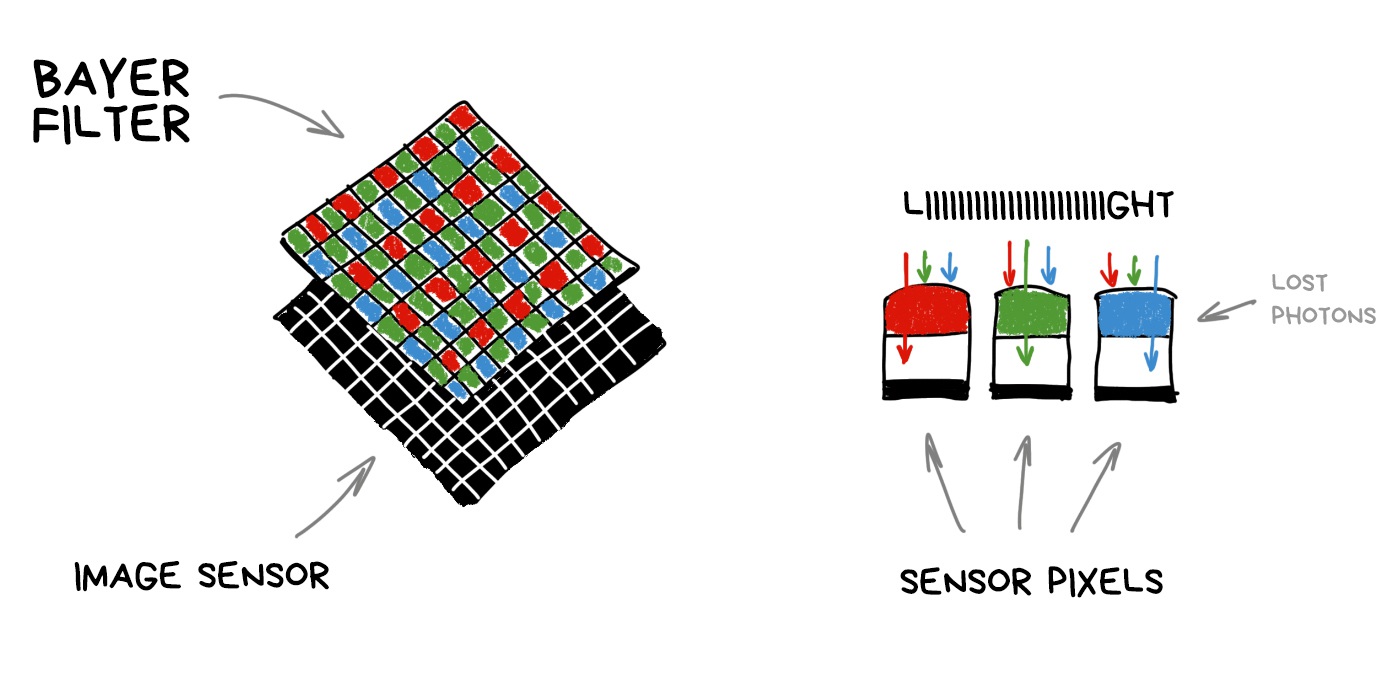
It turns out that each pixel of the sensor catches only R, G or B-component because rest of the photons are mercilessly reflected by Bayer filter. Missing components are computed by averaging nearby pixels later.
Made by analogy with the human eye, the Bayer filter has more green cells than others. Thus, out of 50 million pixels on the sensor, about 25 million will only (!) capture the green light, while red and blue will capture 12.5 million each. The rest is averaged. This process called debayering or demosaicing and this is that fat and funny kludge which keeps everything together.
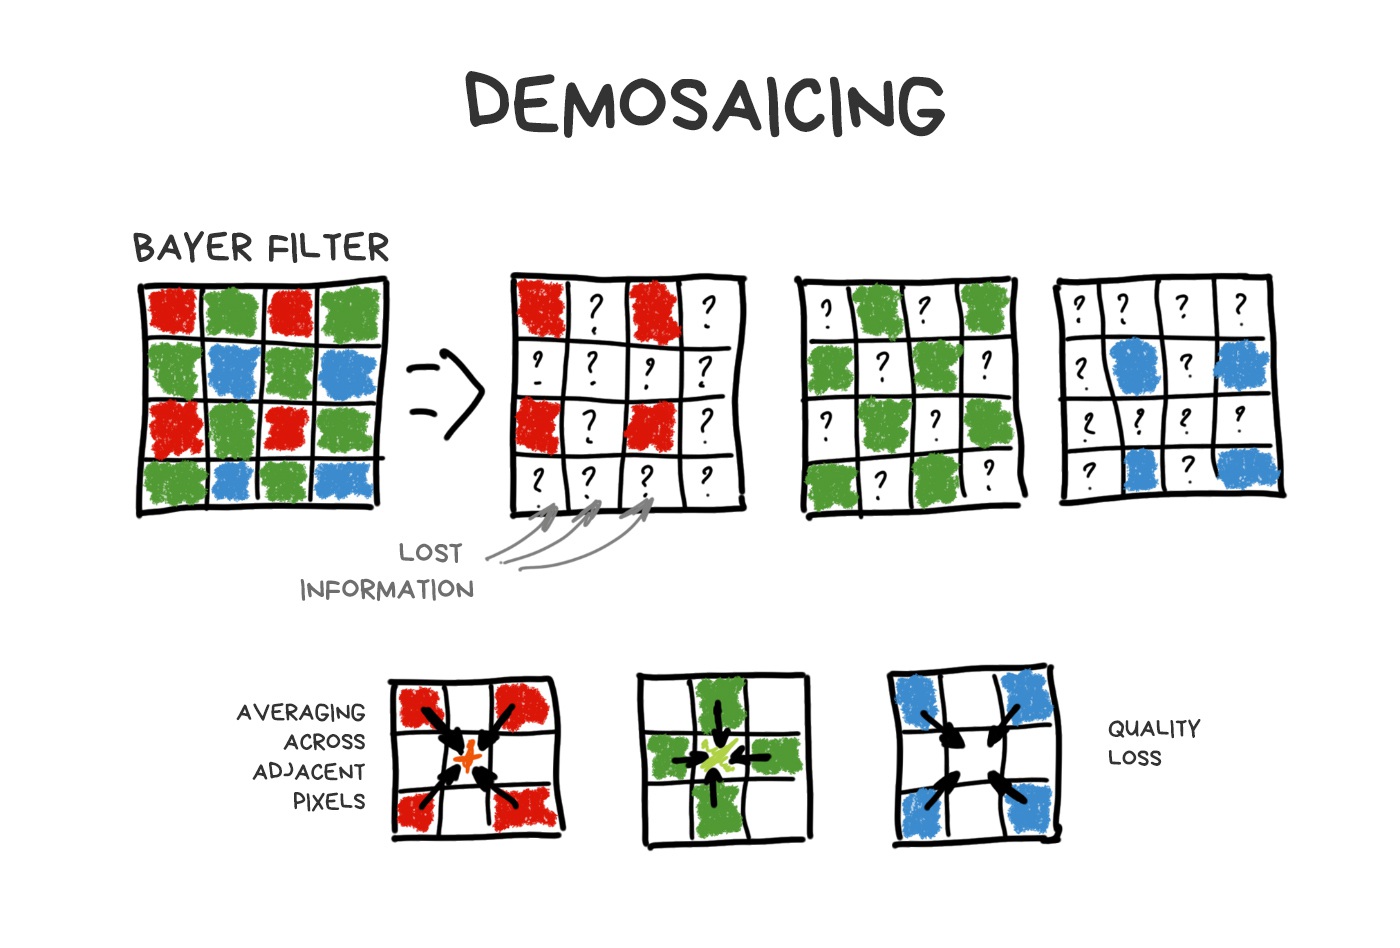
In fact, each sensor has its own tricky and (of course) patented demosaicing algorithm, but in this story we don't care.
Other types of sensors (such as Foveon) didn't get that popular. Some rare smartphone manufacturers like Huawei though tried to play with non-Bayer filters to improve sharpness and dynamic range. Mostly unsuccessful.
Thanks to the Bayer filter, we lose a ton of photons, especially in the dark. Thus, we came up with the idea of Pixel Shifting — shift the sensor by one-pixel up-down-left-right to catch them all. The photo doesn't appear to be 4 times larger, as you might think, it just helps the demosaicing algorithm do its job better — now it can average colors not by neighboring pixels, but by 4 versions of itself.
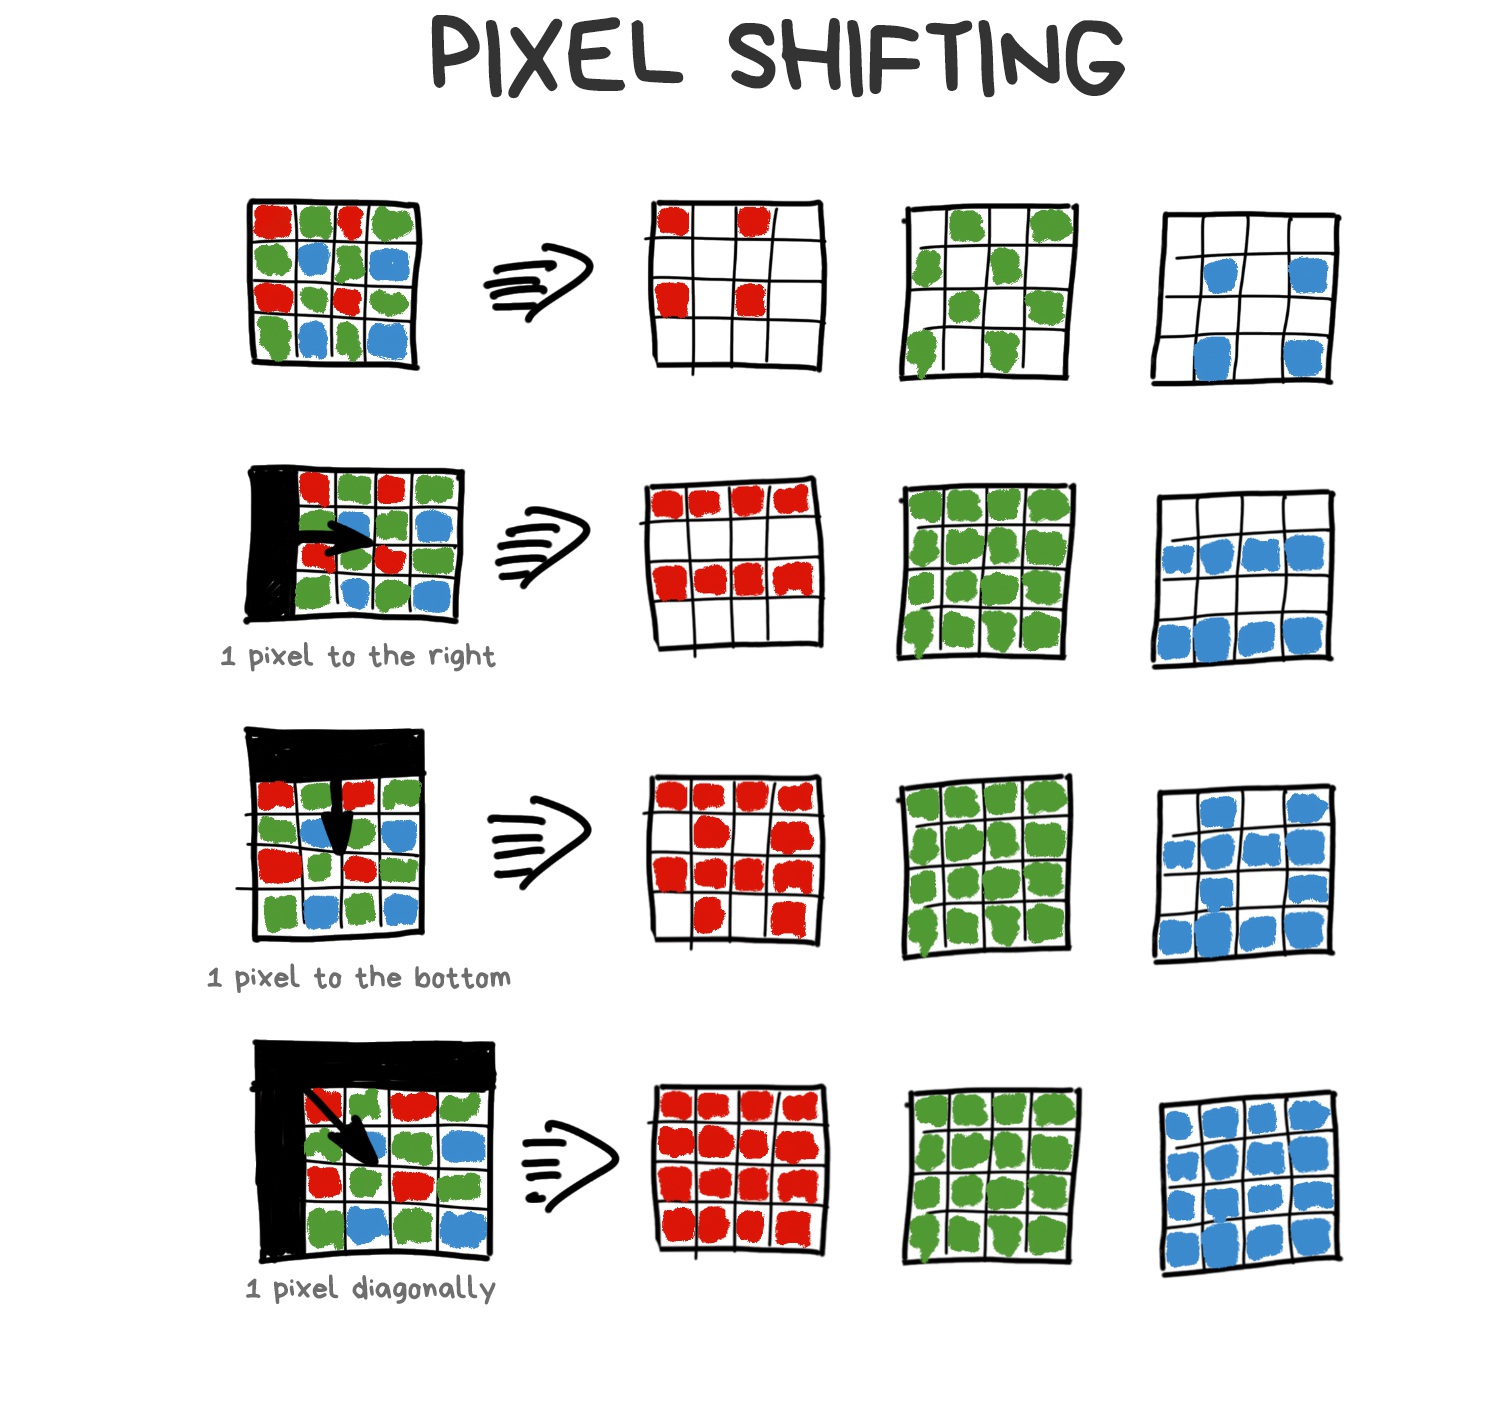

Our shaking hands make Pixel Shifting natural for mobile photography. And that's how it implemented in the latest versions of Google Pixel. You notice it when zooming on your Android phone. This zooming called Super Res Zoom (yes, I also enjoy the harsh naming). Chinese manufacturers already copied it to their phones, although it's worse than the original.
📝 SIGGRAPH 2019: Handheld Multi-frame Super-resolution
📝 See Better and Further with Super Res Zoom on the Pixel 3
Stacking of slightly shifted photos allows us to collect more information about every pixel to reduce noise, sharpen and raise the resolution without increasing the physical number of sensor megapixels. Modern Android phones do it automatically, while their users don't even realize.

The method came from macro photography, where the depth of field has always been a problem. To keep the entire object in focus, you had to take several shots, moving focus back and forth, and combine them later into one sharp shot in photoshop. The same method is often used by landscape photographers to make the foreground and background sharp as shark.
Of course, it all migrated to smartphones. With no hype, though. Nokia released Lumia 1020 with "Refocus App" in 2013, and Samsung Galaxy S5 did the same in 2014 with "Selective Focus". Both used the same approach — they quickly took 3 photos: focused one, focus shifted forth and shifted back. The camera then aligned the images and allowed you to choose one of them, which was introduced as a "real" focus control in the post-production.
There was no further processing, as even this simple hack was enough to hammer another nail in the coffin of Lytro and analogs that used a fair refocus. Let's talk about them, by the way (topic change master 80 lvl).
Well, our sensors are shit. We simply got used to it and trying to do our best with them. They haven't changed much in their design from the beginning of time. Technical process was the only thing that improved — we reduced the distance between pixels, fought noise, and added specific pixels for phase-detection autofocus system. But even if we take the most expensive camera to try to photograph a running cat in the indoor light, the cat will win.
🎥 The Science of Camera Sensors
We've been trying to invent a better sensor for a long time. You can google a lot of researches in this field by "computational sensor" or "non-Bayer sensor" queries. Even the Pixel Shifting example can be referred to as an attempt to improve sensors with calculations.
The most promising stories of the last twenty years, though, come to us from plenoptic cameras.
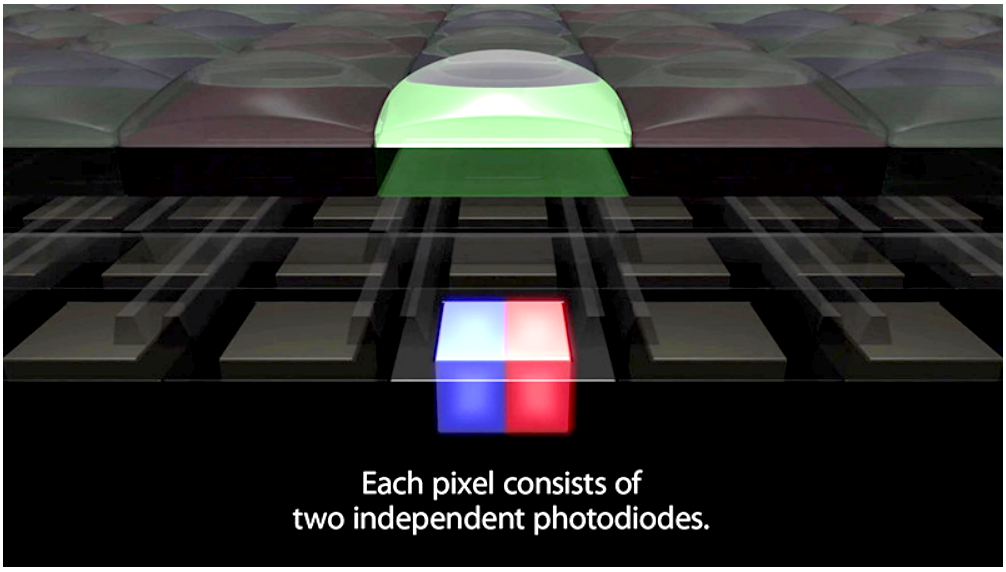
To calm your sense of impending boring math, I'll throw in the insider's note — the last Google Pixel camera is a little bit plenoptic. With only two pixels in one, there's still enough to calculate a fair optical depth of field map without having a second camera like everyone else.
Plenoptics is a powerful weapon that hasn't fired yet.
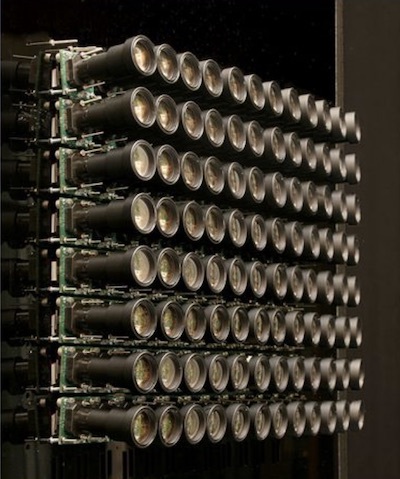
Invented in 1994. For the first time assembled in Stanford in 2004. The first consumer product — Lytro, released in 2012. The VR industry is now actively experimenting with similar technologies.
Plenoptic camera differs from the normal one by only one modification. Its sensor covered with a grid of lenses, each of which covers several real pixels. Somehow like that:
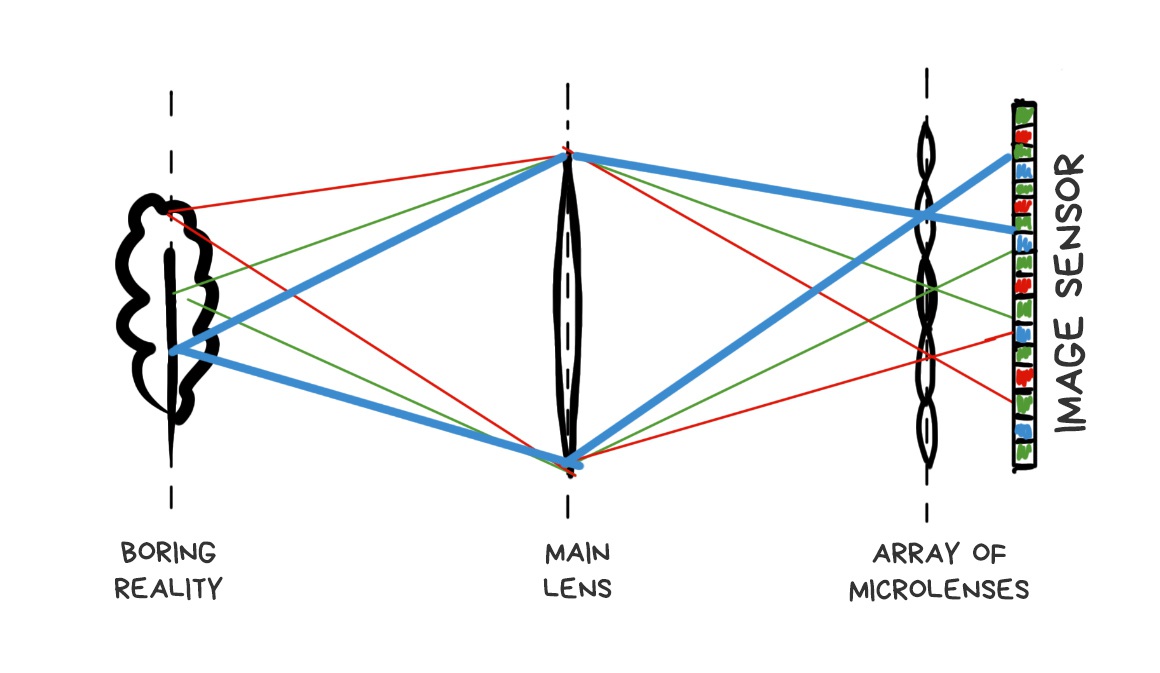
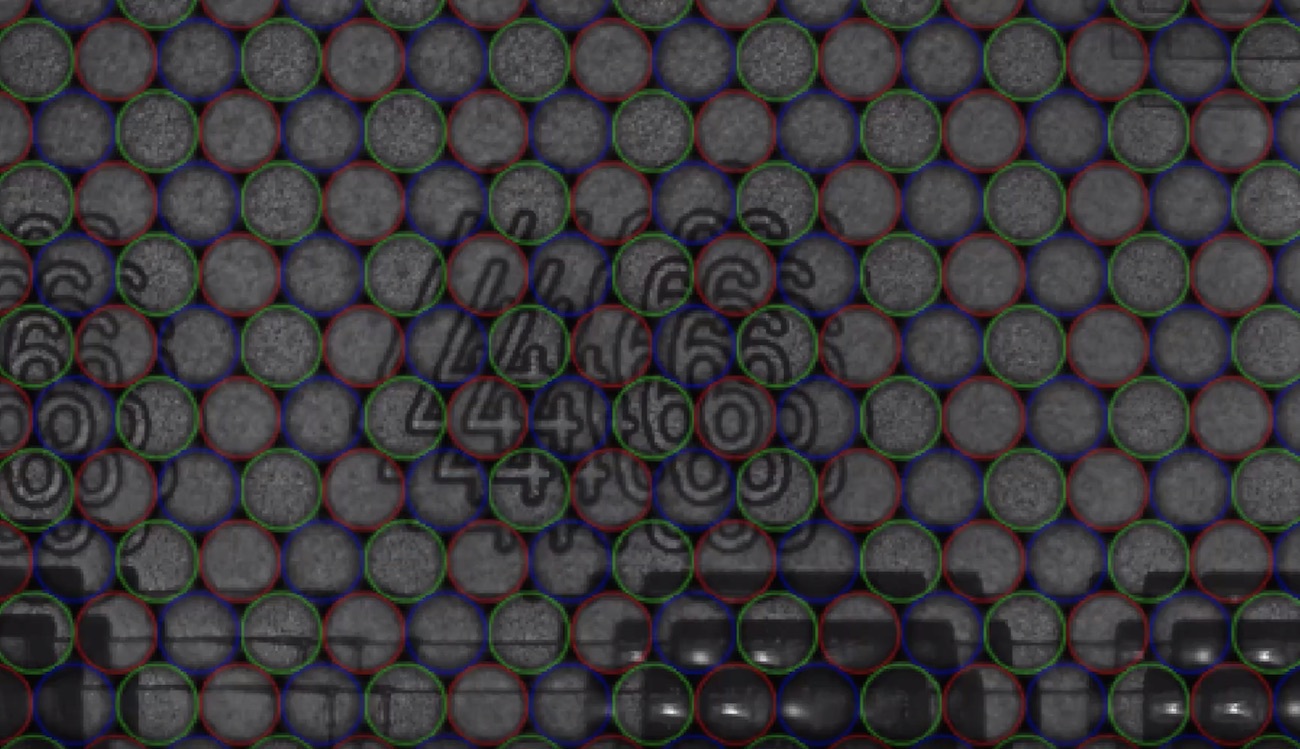
If we place the grid and sensor at the right distance, we'll see sharp pixel clusters containing mini-versions of the original image on the final RAW image.
🎥 Muted video showing RAW editing process
Apparently, if you take only one central pixel from each cluster and build the image only from them, it won't be any different from one taken with a standard camera. Yes, we lose a bit in resolution, but we'll just ask Sony to stuff more megapixels in the next sensor.
That's where the fun part begins. If you take another pixel from each cluster and build the image again, you again get a standard photo, only as if it was taken with a camera shifted by one pixel in space. Thus, with 10x10 pixel clusters, we get 100 images from "slightly" different angles.
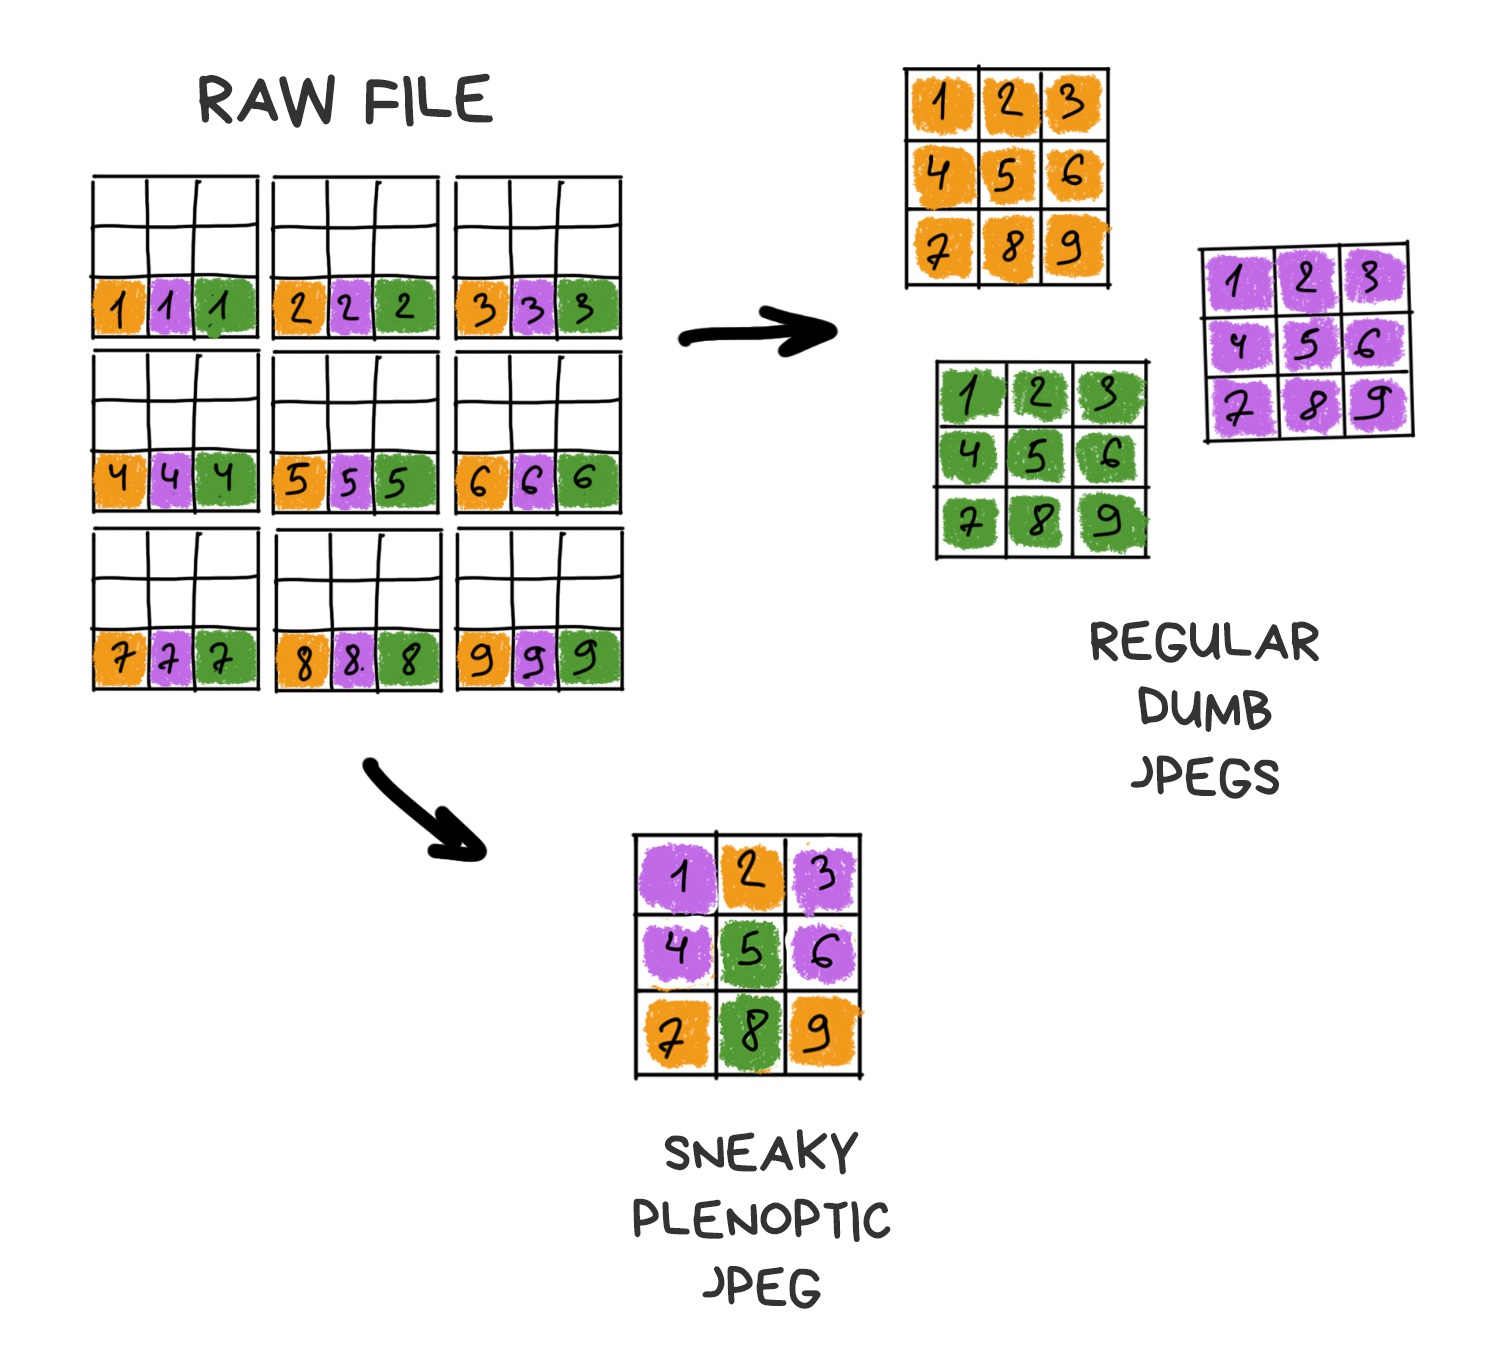
The more the cluster size, the more images we have. Resolution is lower, though. In the world of smartphones with 41-megapixel sensors, everything has a limit, although we can neglect resolution a bit. We have to keep the balance.
📝 plenoptic.info - about plenoptics, with python code samples
Alright, we've got a plenoptic camera. What can we do with it?
The feature that everyone was buzzing about in the articles covering Lytro is a possibility to adjust focus after the shot was taken. "Fair" means we don't use any deblurring algorithms, but rather only available pixels, picking or averaging in the right order.
A RAW photo taken with a plenoptic camera looks weird. To get the usual sharp JPEG out of it, you have to assemble it first. The result will vary depending on how we select the pixels from the RAW.
The farther is the cluster from the point of impact of the original ray, the more defocused the ray is. Because the optics. To get the image shifted in focus, we only need to choose the pixels at the desired distance from the original — either closer or farther.
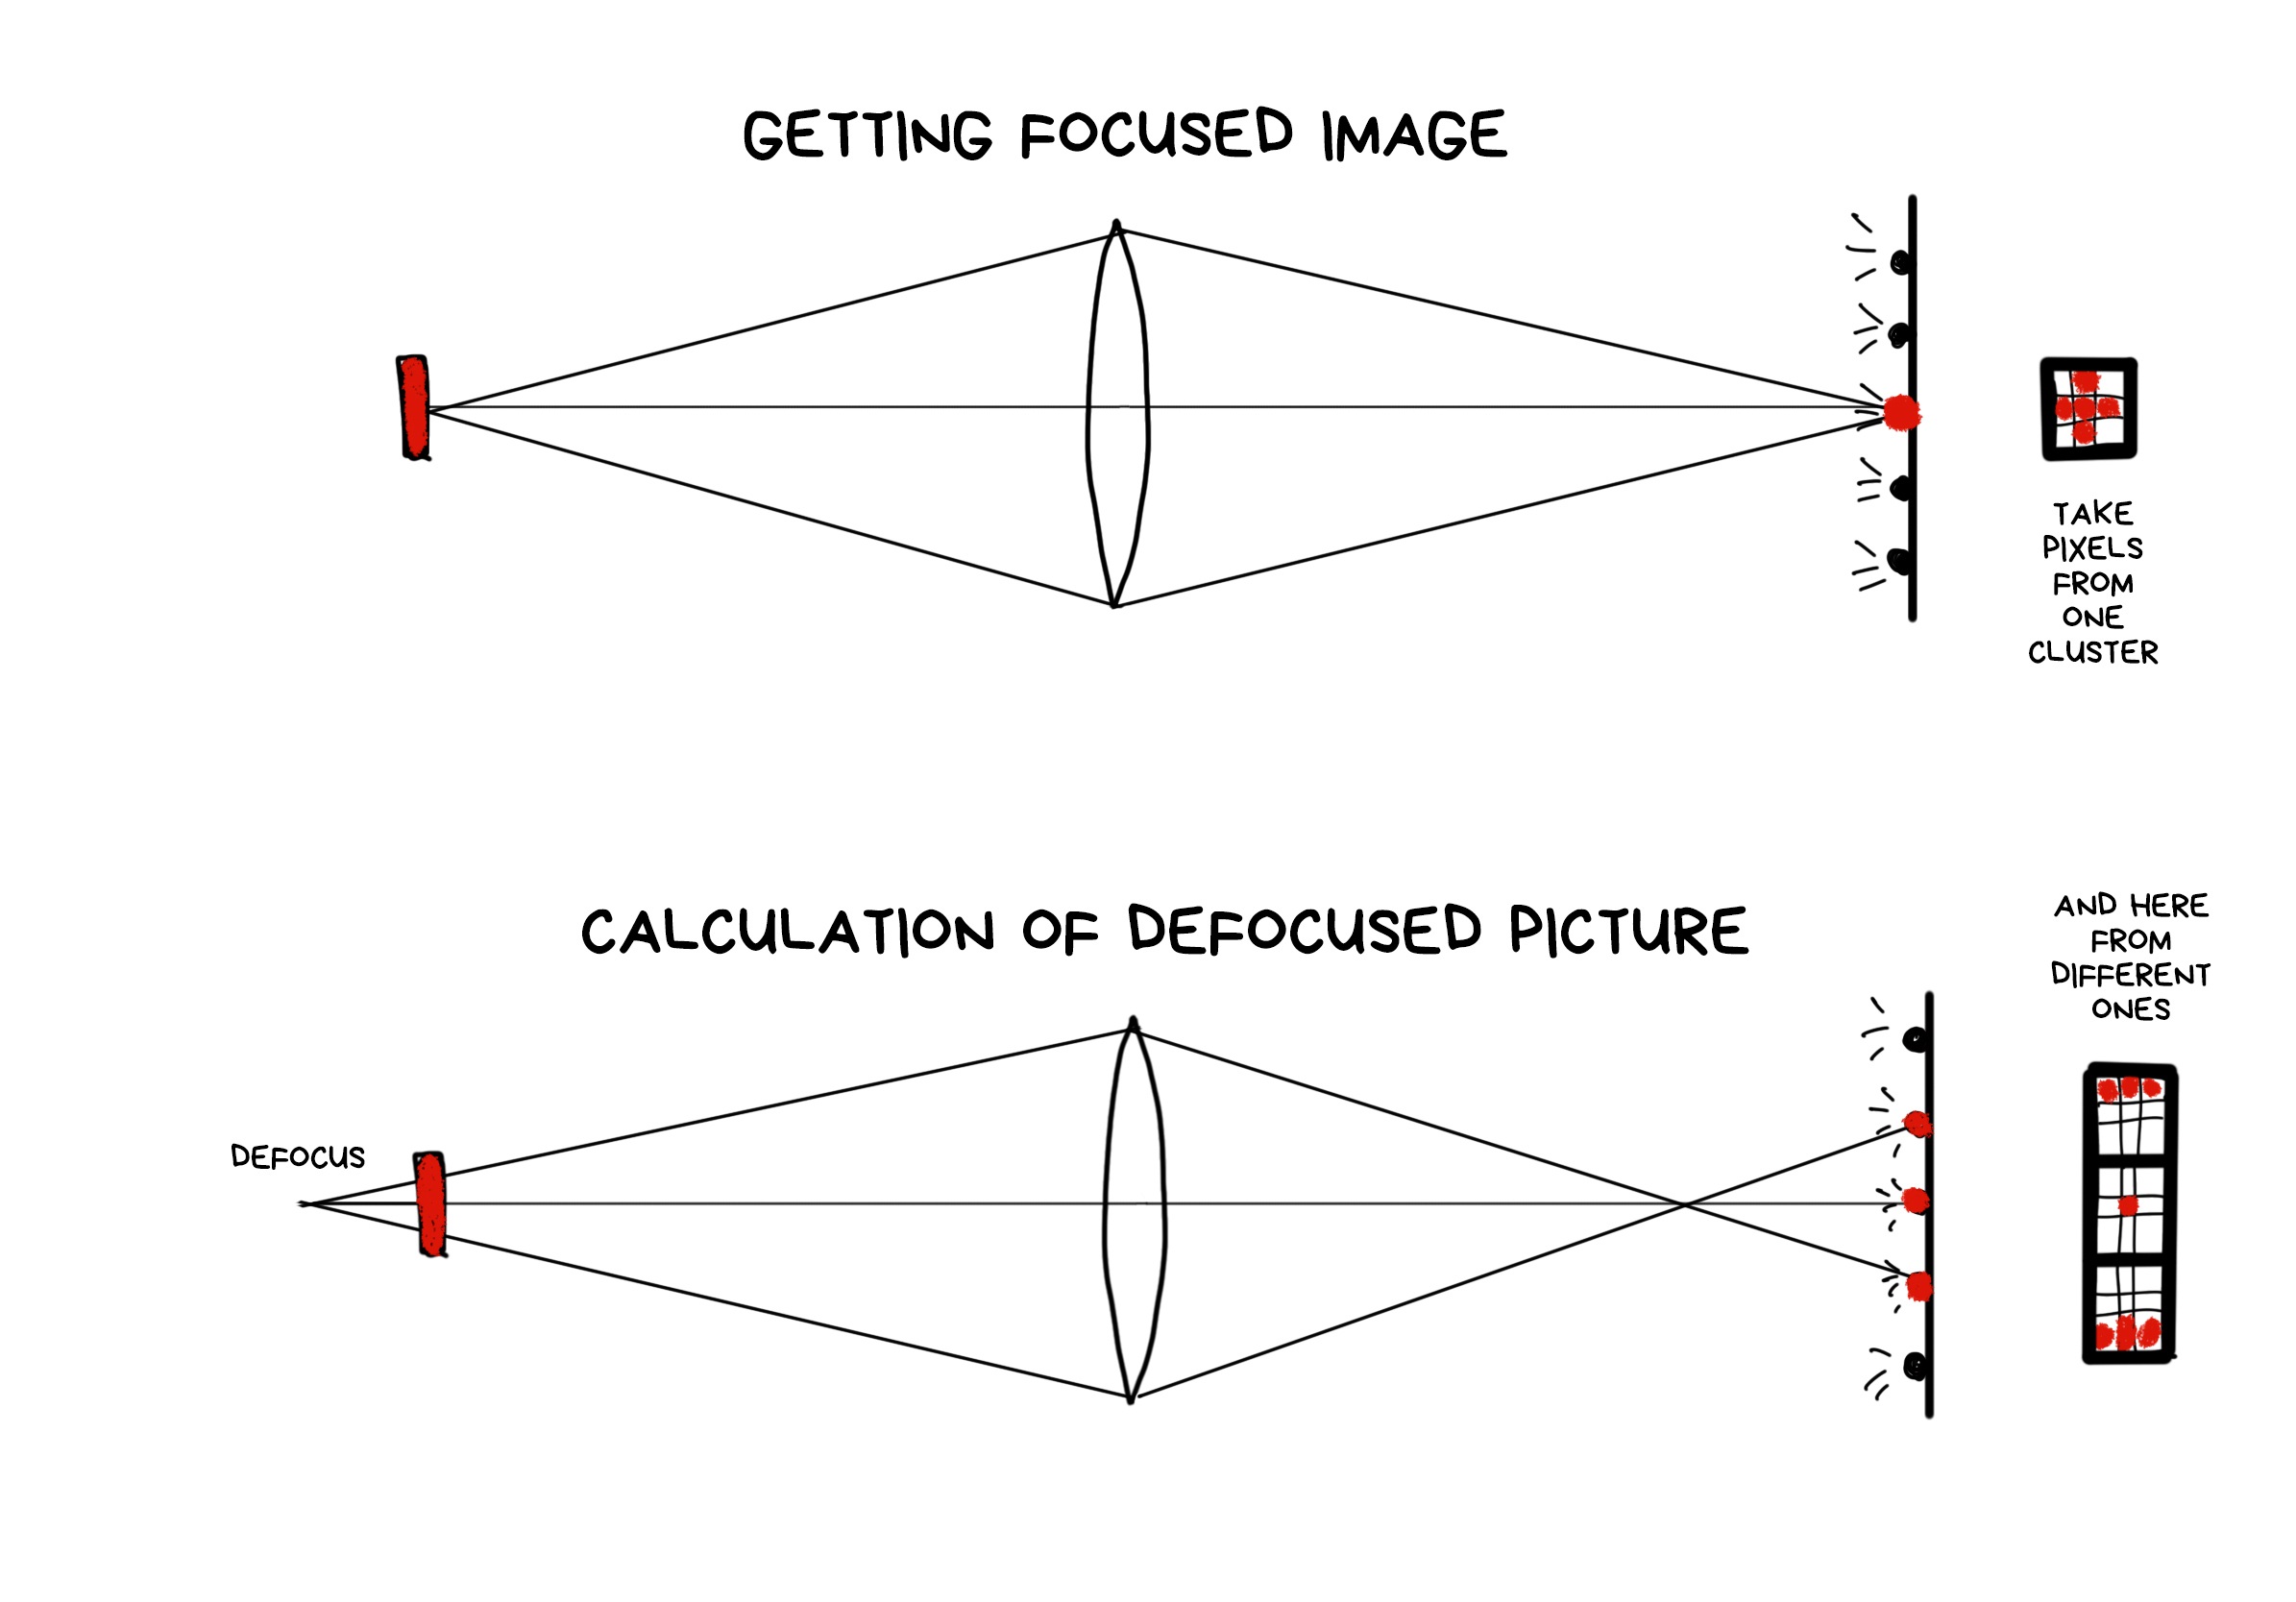
The process of shifting the focus forward is a bit more complicated as we have fewer pixels in these parts of the clusters. In the beginning, Lytro developers didn't even want to let the user focus manually because of that — the camera made a decision itself using the software. Users didn't like that, so the feature was added in the late versions as "creative mode", but with very limited refocus for exactly that reason.
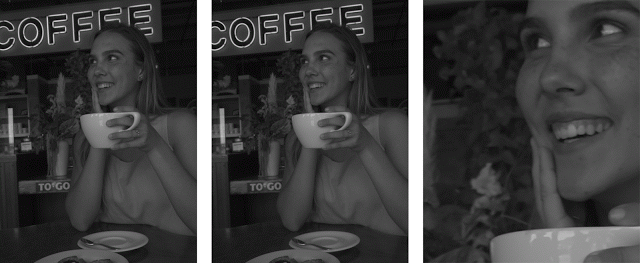
One of the simplest operations in plenoptics is to get a depth map. You just need to gather two different images and calculate how the objects are shifted at them. More shift — farther away from the camera.
Google recently bought and killed Lytro, but used their technology for its VR and... Pixel's camera. Starting Pixel 2, the camera became "a little bit" plenoptic, though with only two pixels per cluster. As a result, Google doesn't need to install a second camera like all the other cool kids. Instead, they can calculate a depth map from one photo.

📝 Portrait mode on the Pixel 2 and Pixel 2 XL smartphones
The depth map is built on two shots shifted by one sub-pixel. This is enough to calculate a binary depth map and separate the foreground from the background to blur it out in the fashionable bokeh. The result of this stratification is still smoothed and "improved" by neural networks which are trained to improve depth maps (rather than to observe, as many people think).
The trick is that we got plenoptics in smartphones almost at no charge. We already put lenses on these tiny sensors to increase the luminous flux at least somehow. In the next Pixel phones, Google has plans to go further and cover four photodiodes with a lens.
You don't see your nose because your brain combines a final image from both of your eyes. Close one eye, and you will see a huge Egyptian pyramid at the edge.
The same effect can be achieved in a plenoptic camera. By assembling shifted images from pixels of different clusters, we can look at the object as if from several points. Same as our eyes do. It gives us two cool opportunities. First is we can estimate the approximate distance to the objects, which allows us easily separate the foreground from the background as in life. And second, if the object is small, we can completely remove it from the photo. Like a nose. Optically, for real, with no photoshop.
Using this, we can cut out trees between the camera and the object or remove the falling confetti, as in the video below.

From a plenoptic RAW, you can make a hundred of photos with several pixels shift over the entire sensor area. Accordingly, we have a tube of lens diameter within which we can move the shooting point freely, thereby offsetting the shake of the image.

Technically, stabilization is still optical, because we don't have to calculate anything — we just select pixels in the right places. On the other hand, any plenoptic camera sacrifices the number of megapixels in favor of plenoptic capabilities, and any digital stabilizer works the same way. It's nice to have it as a bonus, but using it only for its sake is doubtful.
The larger sensor and lens, the bigger window for movement. The more camera capabilities, the more ozone holes from supplying this circus with electricity and cooling. Yeah, technology!
Bayer filter is still necessary even with a plenoptic camera. We haven't come up with any other way of getting a colorful digital image. And using a plenoptic RAW, we can average the color not only by the group of nearby pixels, as in the classic demosaicing, but also using dozens of its copies in neighboring clusters.
It's called "computable super-resolution" in some articles, but I would question it. In fact, we reduce the real resolution of the sensor in these same dozen times first in order to proudly restore it again. You have to try hard to sell it to someone.
But technically it's still more interesting than shaking the sensor in a pixel shifting spasm.

Those who like to shoot bokeh hearts will be thrilled. Since we know how to control the refocus, we can move on and take only a few pixels from the unfocused image and others from the normal one. Thus we can get an aperture of any shape. Yay! (No)
So, not to move too far away from the photo topic, everyone who interested could check out the links above and below. They contain about half a dozen other interesting applications of a plenoptic camera.
🎥 Watch Lytro Change Cinematography Forever
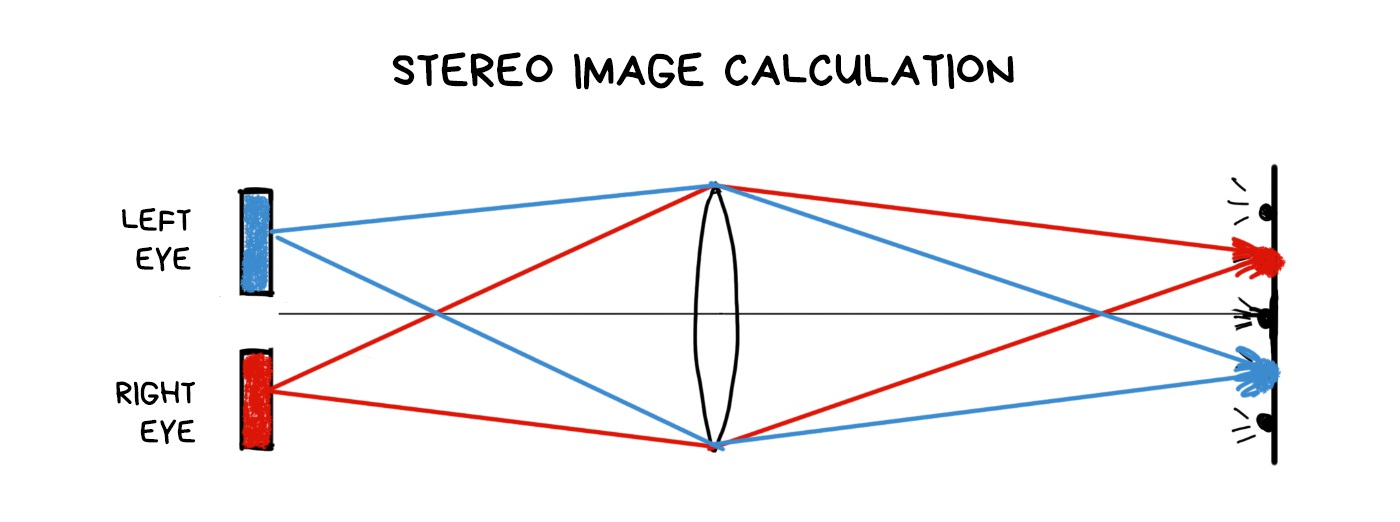
Usually, the explanation of plenoptic starts from light fields. And yes, from the science perspective, the plenoptic camera captures the light field, not just the photo. Plenus comes from the Latin "full", i.e., collecting all the information about the rays of light. Just like a Parliament plenary session.
Let's get to the bottom of this to understand what is a light field is and why do we need it.
Traditional photo is two-dimensional. There, where ray hit a sensor will be a pixel on a photo. The camera doesn't give a shit where the ray came from, whether it accidentally fell from aside or was reflected by a lovely lady's ass. The photo captures only the point of intersection of the ray with the surface of the sensor. So it's kinda 2D.
Light field image is the same, but with a new component — the origin of the ray. Means, it captures the ray vector in 3D space. Like calculating the lighting of a video game, but the other way around — we're trying to catch the scene, not create it. The light field is a set of all the light rays in our scene — both coming from the light sources and reflected.
The light field is essentially a visual model of the space around it. We can easily compute any photo within this space mathematically. Point of view, depth of field, aperture — all these are also computable.
I love to draw an analogy with a city here. Photography is like your favourite path from your home to the bar you always remember, while the light field is a map of the whole town. Using the map, you can calculate any route from point A to B. In the same way, knowing the light field, we can calculate any photo.
For an ordinary photo it's an overkill, I agree. But here comes the VR, where the light fields there are one of the most promising areas.
Having a light field model of an object or a room allows you to see this object or a room from any point in space as if everything around is virtual reality. It's no longer necessary to build a 3D-model of the room if we want to walk through it. We can "simply" capture all the rays inside it and calculate a picture of the room. Simply, yeah. That's what we're fighting over.
📝 Google AR and VR: Experimenting with Light Fields
Saying optics, I with the guys from Stanford mean not only lenses but everything in between the object and sensor. Even the aperture and shutter. Sorry, photography snobs. I feel your pain.
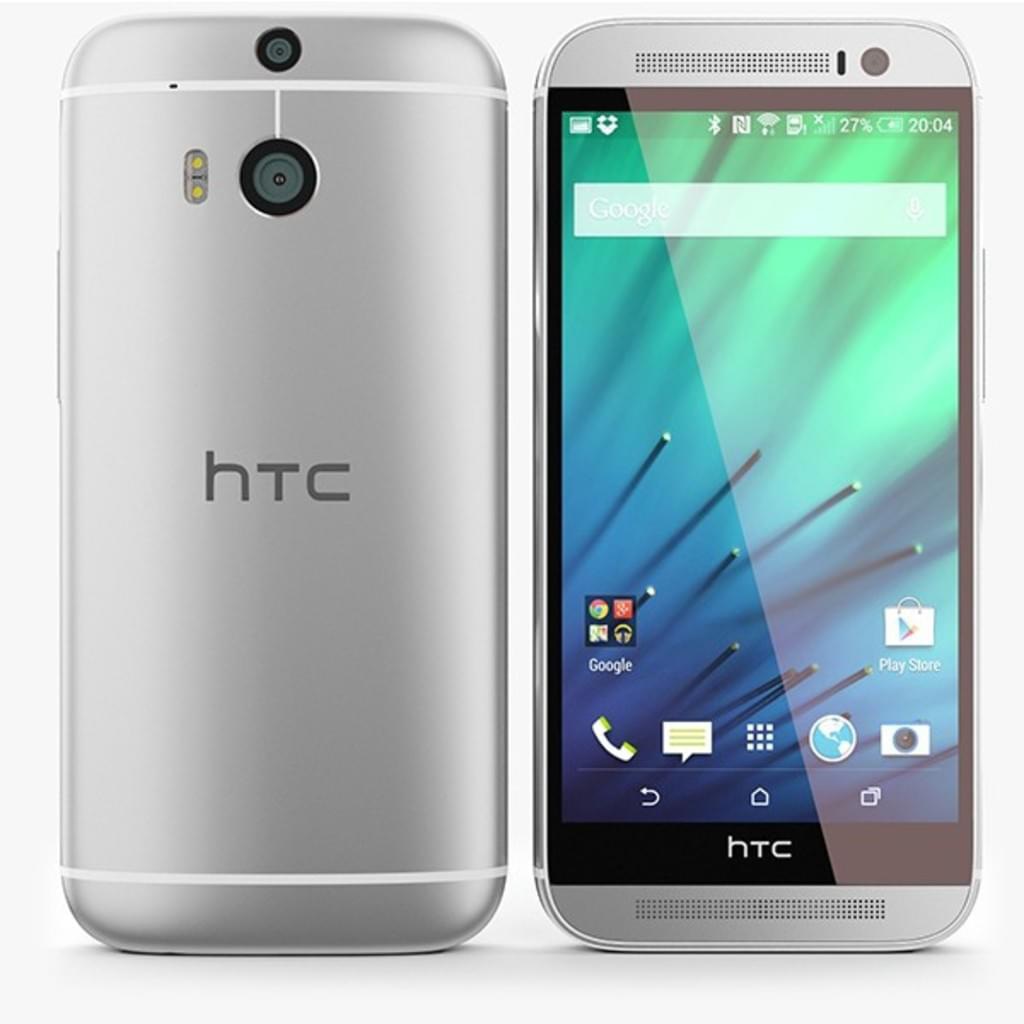
In 2014, the HTC One (M8) was released and became the first smartphone with two cameras and amusing computational photography features such as replacing the background with rain or sparkles.
The race has begun. Everybody started putting two, three, five lenses into their smartphones, trying to argue whether telephoto or wide-angle lens is better. Eventually, we got the Light L16 camera. 16-lensed, as you can guess.
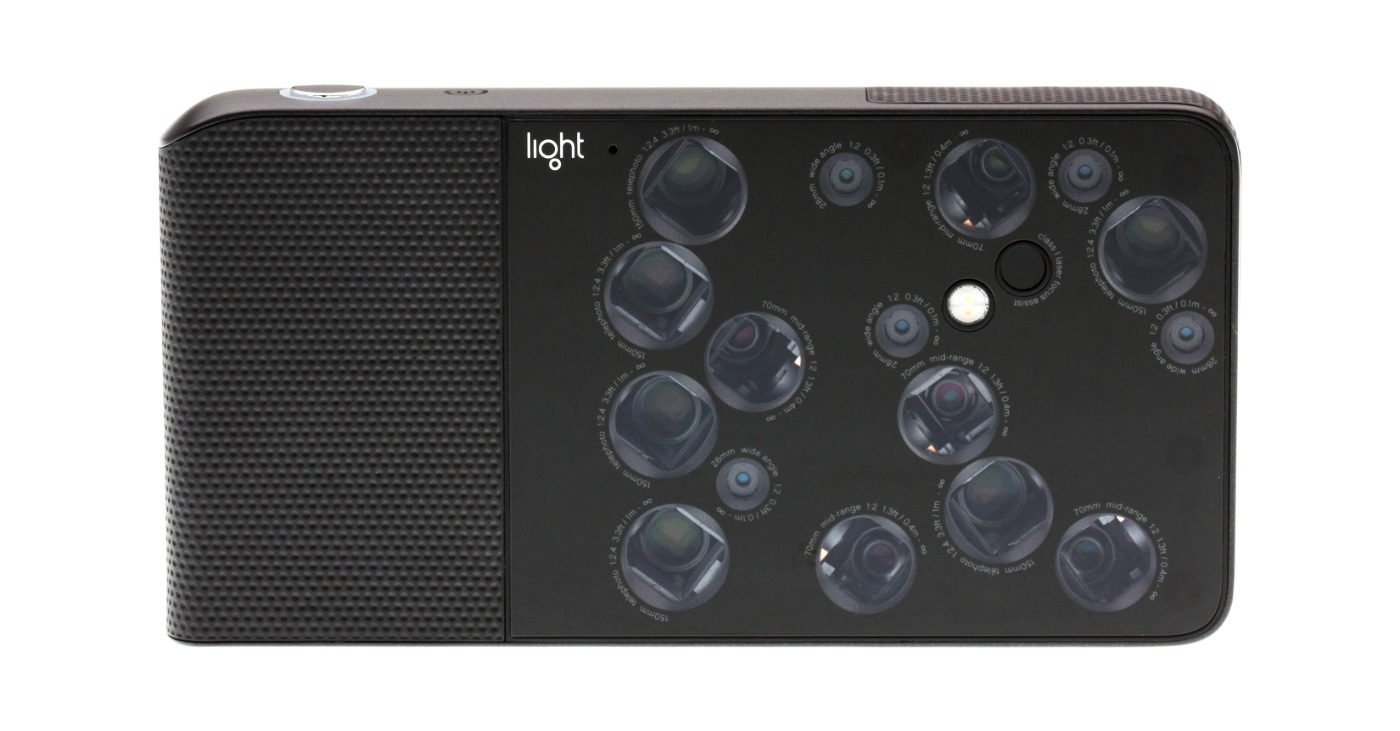
L16 was no longer a smartphone, but rather a new kind of pocket camera. It promised to reach the quality of top DSLRs with a high-aperture lens and full-frame sensor while yet fitting into your pocket. The power of computational photography algorithms was the main selling point.
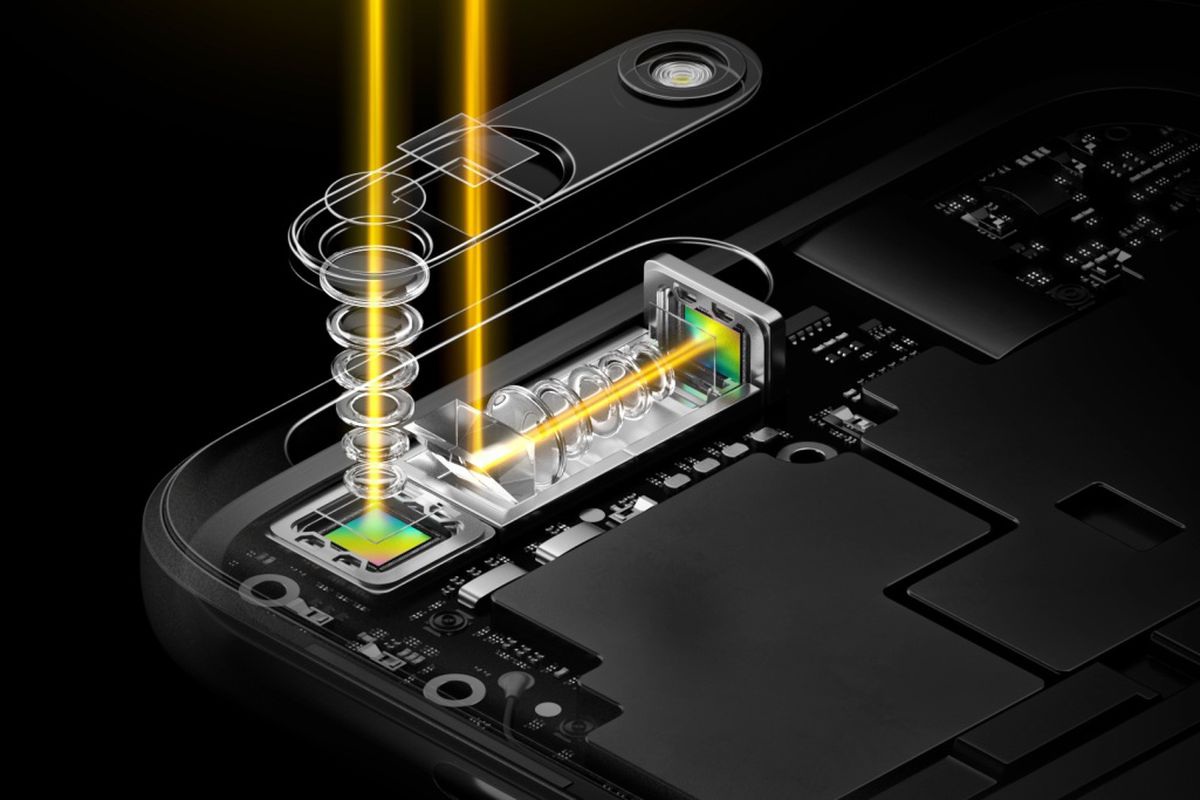
It had 16 lenses: 5 x 28mm wide-angle and 5 x 70mm and 6 x 150mm telephoto. Each telephoto was periscope-style, meaning that the light did not flow directly through the lens to the sensor, but was reflected by a mirror inside the body. This configuration made it possible to fit a sufficiently long telephoto into a flat body, rather than stick out a "pipe" from it. Huawei recently did the same thing in the P30 Pro.
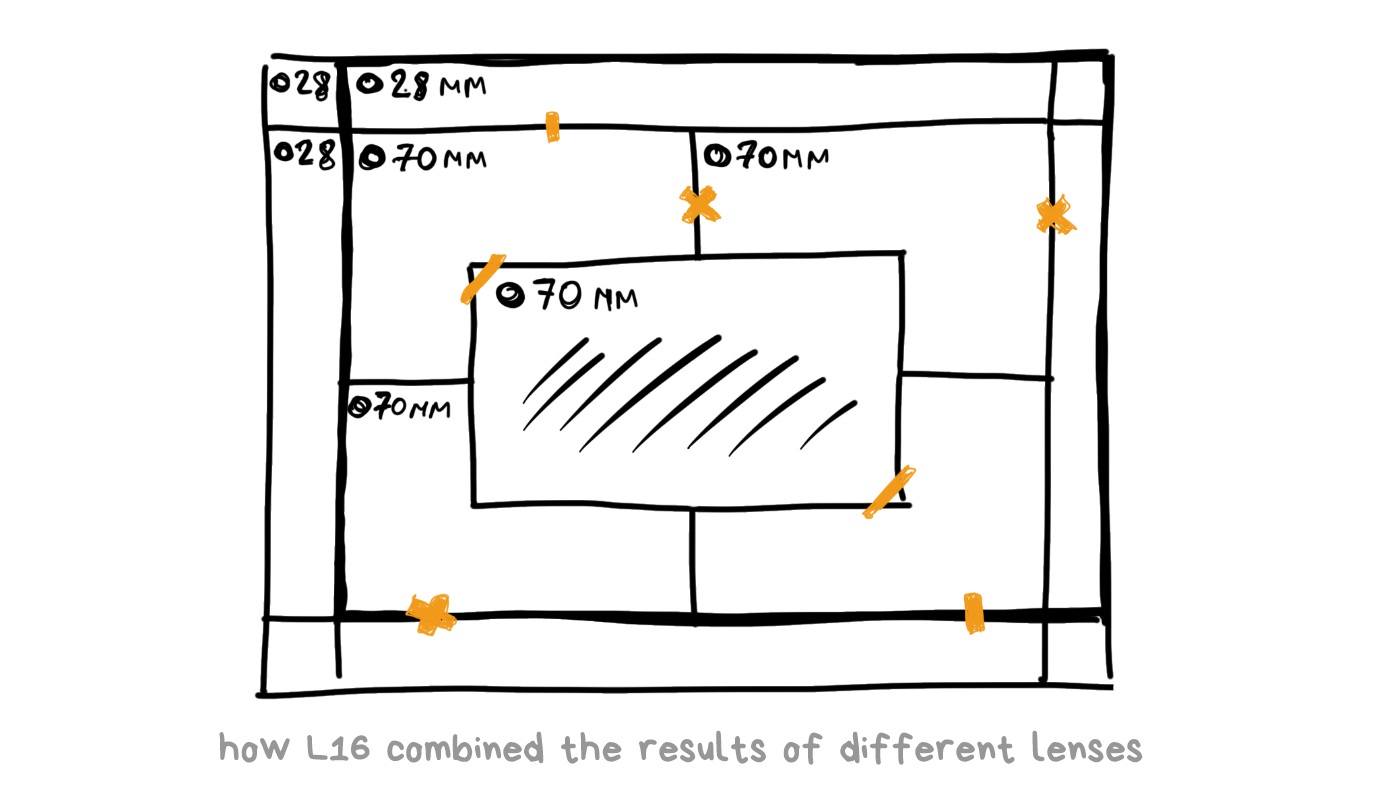
Each L16 photo was shot simultaneously on 10 or more lenses, and then the camera combined them to get a 52-megapixel image. According to the creators' idea, simultaneous shooting with several lenses made it possible to catch the same amount of light as with the large digital camera lens, artfully bypassing all the laws of optics.
Talking of software features, the first version had a depth of field and focus control in post-production. Minimal set. Having photos from different perspectives made it possible to compute the depth of the image and apply a decent software blur. Everything seemed nice on paper, so before the release, everybody even had hope for a bright computing future.
In March 2018, Light L16 penetrated the market and… miserably failed. Yes, technologically it was in the future. However, at a price of $2000 it had no optical stabilization, so that the photos were always blurred (no wonder with 70-150 mm lenses), the autofocus was tediously slow, the algorithms of combining several pictures gave strange sharpness fluctuations, and there was no use for the camera in the dark, as it had no algorithms such as Google's HDR+ or Night Sight. Modern $500 point-and-shoot cameras with RAW support were able to do it from the start, so sales were discontinued after the first batch.
However, Light did not shut down at this point (hehe, pun). It raised the cash and continues to work on the new version with redoubled force. For instance, their technologies used in the recent Nokia 9, which is a terrible dream of trypophobe. The idea is encouraging, so we are waiting for further innovations.
🎥 Light L16 Review: Optical Insanity
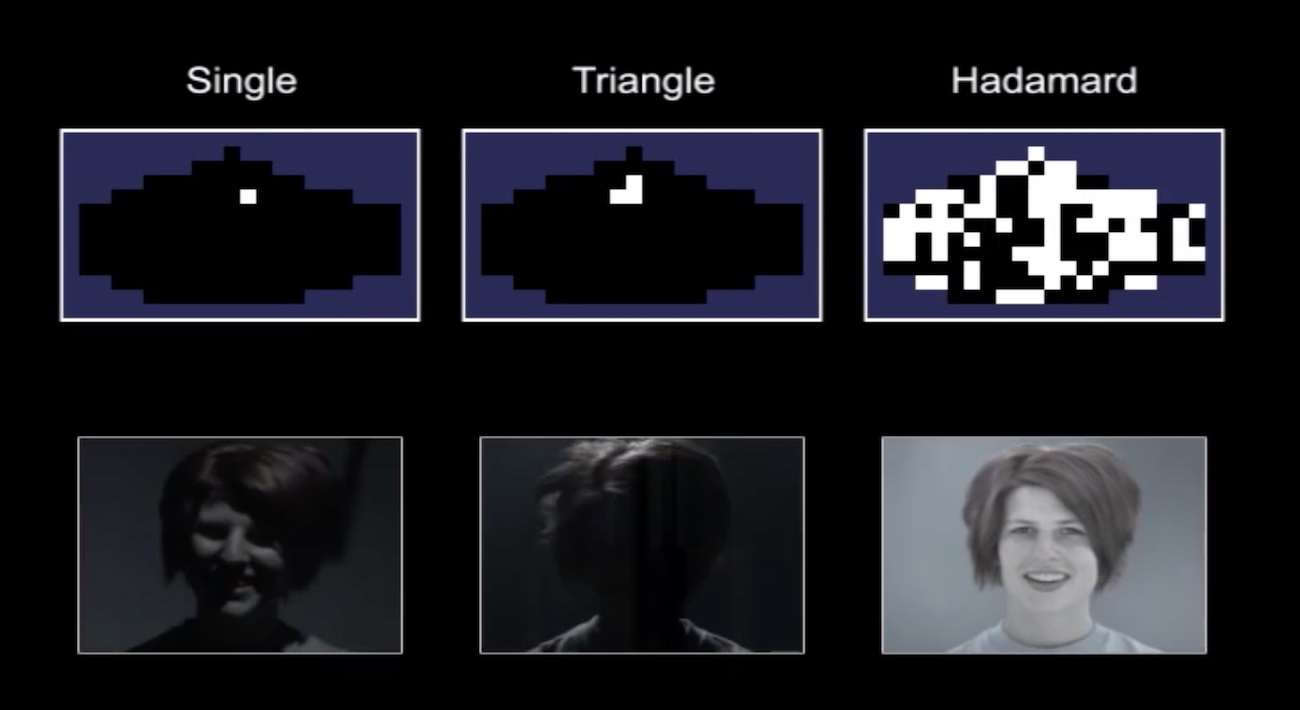
We're entering the area of telescopes, X-rays, and other fog of war. We won't go deep, but it's safer to fasten your seatbelts. The story of the coded aperture began where it was physically impossible to focus the rays: for gamma and X-ray radiation. Ask your physics teacher; they will explain why.
The essence of the coded aperture is to replace the standard petal diaphragm with a pattern. The position of the holes should ensure that the overall shape is maximally varied depending on the defocus — the more diverse, the better. Astronomers invented the whole range of such patterns for their telescopes. I'll cite the very classical one here.
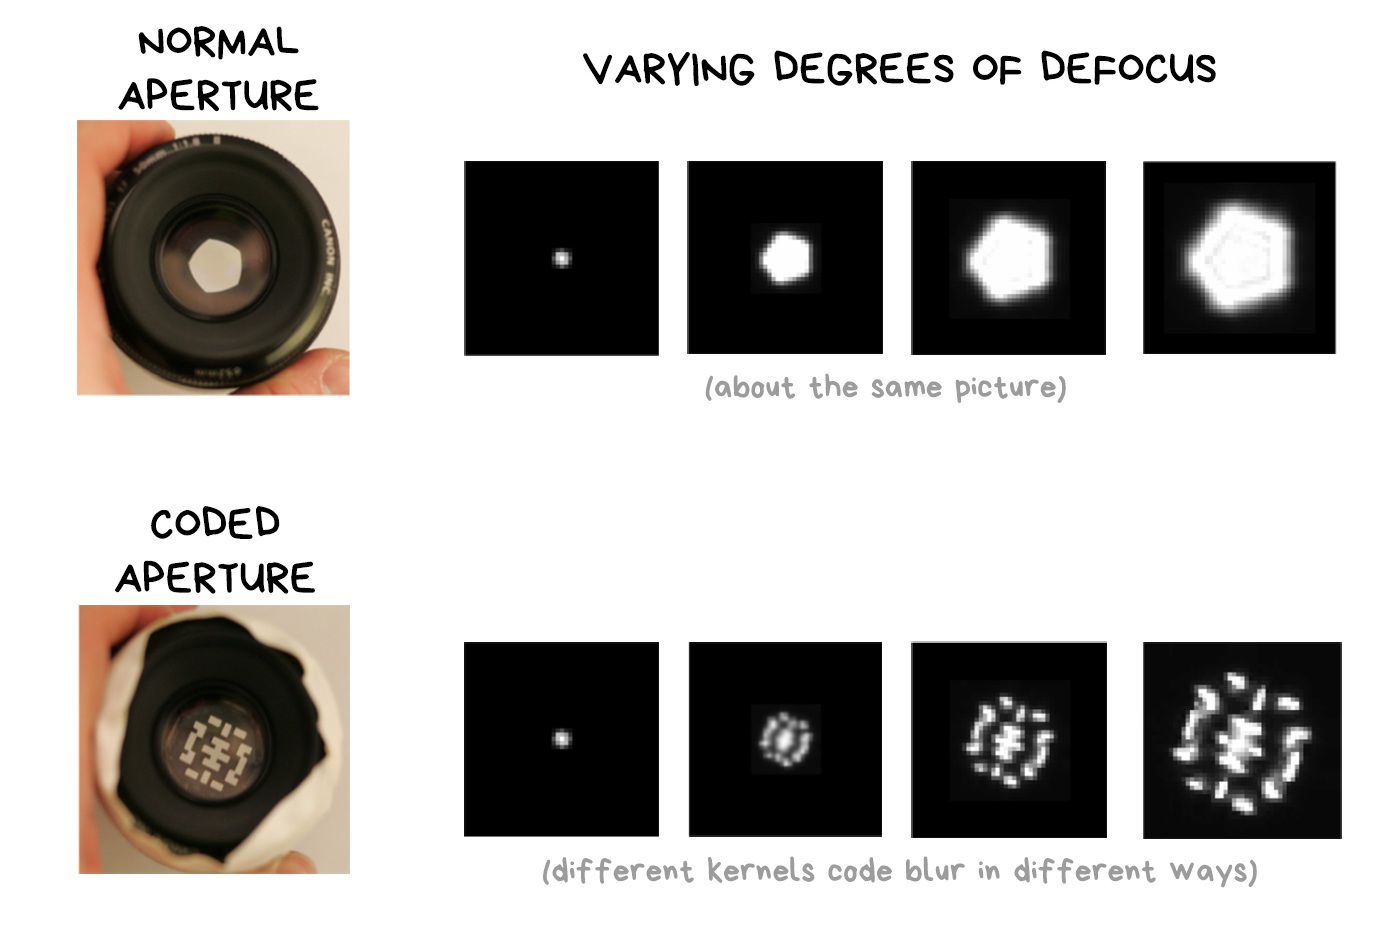
How does this work?
When we focus on the object, everything beyond our depth of field is blurred. Physically, blur is when a lens projects one ray onto several pixels of the sensor due to defocus. So a street lamp turns into a bokeh pancake.
Mathematicians use the term convolution and deconvolution to refer to these operations. Let's remember these words cause they sound cool!
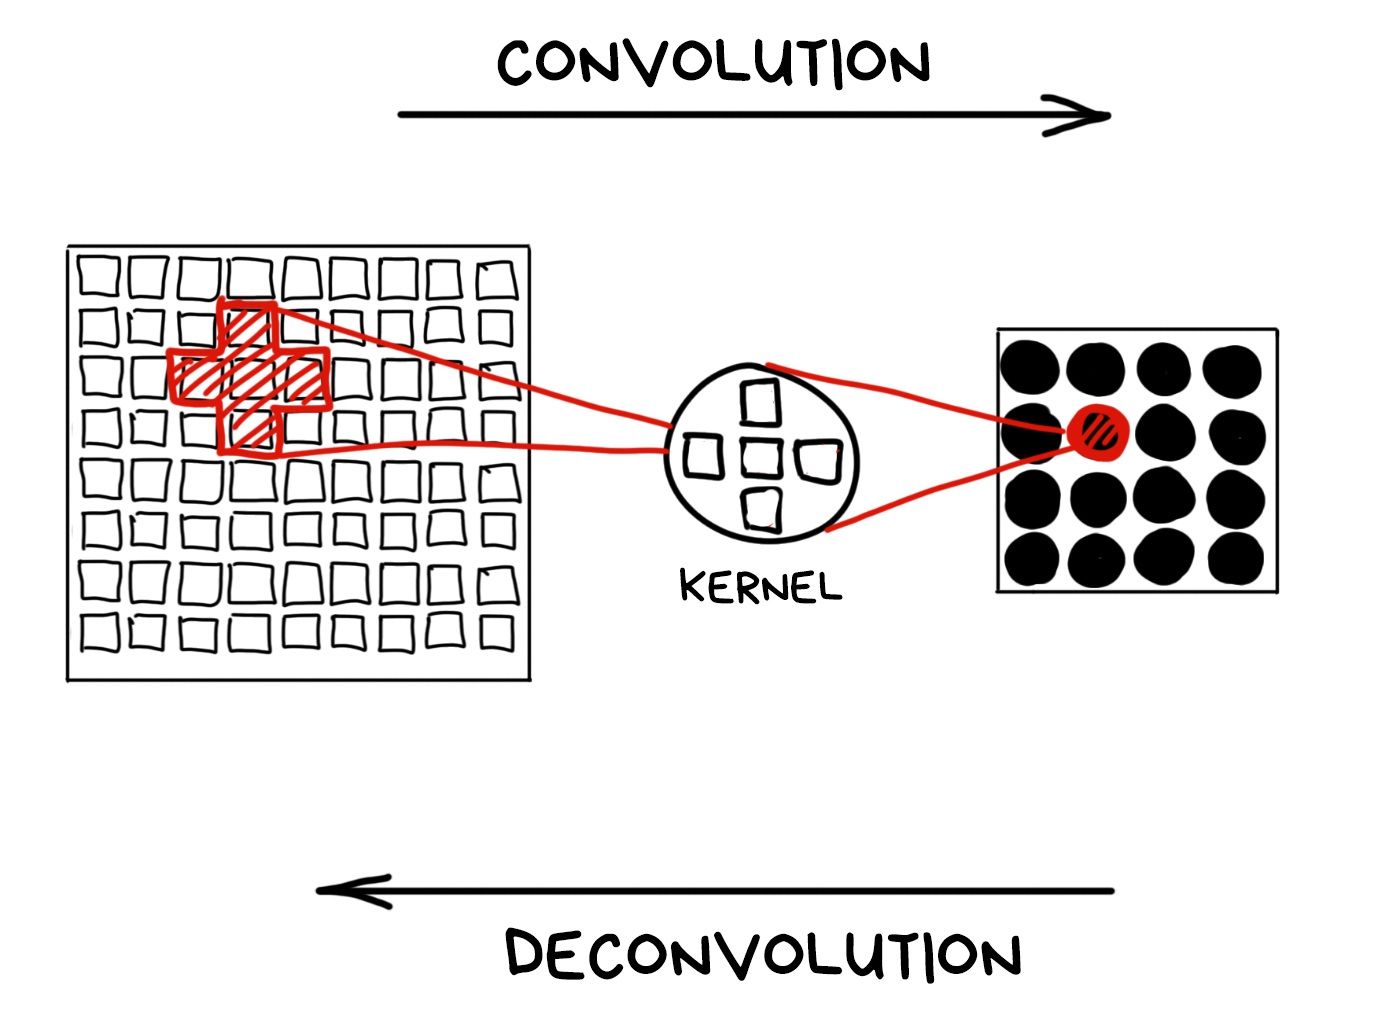
Technically, we can turn any convolution back if we know the kernel. That's what mathematicians say. In reality, we have a limited sensor range and non-ideal lens, so all of our bokeh is far from the mathematical ideal and cannot be fully restored.
📝 High-quality Motion Deblurring from a Single Image
We can still try if we know the kernel of the convolution. Not gonna keep you waiting — the kernel is actually the shape of the aperture. In other words, the aperture makes a mathematical convolution using pure optics.
The problem is that the standard round aperture remains round at any level of blurring. Our kernel is always about the same; it's stable, but not very useful. In case of encoded aperture, rays with different defocus degrees will be encoded with different kernels. Readers with IQ > 150 have already guessed what will happen next.
The only issue remains is to understand which kernel is encoded in each area of the image. You can try it on manually, by testing different kernels and looking where the convolution turns out to be more accurate, but this is not our way. A long time ago, people invented the Fourier transform for this. Don't want to abuse you with calculus, so I'll add a link to my favorite explanation for those who are interested.
🎥 But what is the Fourier Transform? A visual introduction
All you need to know is that the Fourier transform allows you to find out which waves are dominant in the pile of overlapped ones. In the case of music, the Fourier will show the frequency of the notes in the complex chord. In the case of photography, it is the main pattern of overlapping light rays, which is the kernel of the convolution.
Since the form of the coded aperture is always different depending on the distance to the object — we can calculate that distance mathematically using only one simple image shot with a regular sensor!
Using the inverse convolution on the kernel, we can restore the blurred areas of the image. Bring back all the scattered pixels.
That's how most deblur tools work. It works even with an average round aperture, yet the result is less accurate.
The downside of the coded aperture is the noise and light loss, which we can't ignore. Lidars and fairly accurate ToF-cameras have wholly negated all the ideas of using a coded aperture in consumer gadgets. If you've seen it somewhere, write in comments.
📝 Image and Depth from a Conventional Camera with a Coded Aperture
📝 Coded Aperture. Computational Photography WS 07/08
🎥 Coded aperture projection (SIGGRAPH 2008 Talks)
According to the latest news, the light is half the wave. Coding the aperture, we control the transparency of the lens, means we control the wave amplitude. Besides the amplitude, there is a phase, which can also be coded.
And yes. It can be done with an additional lens, which reverses the phase of light passing through it. Like on the Pink Floyd cover.
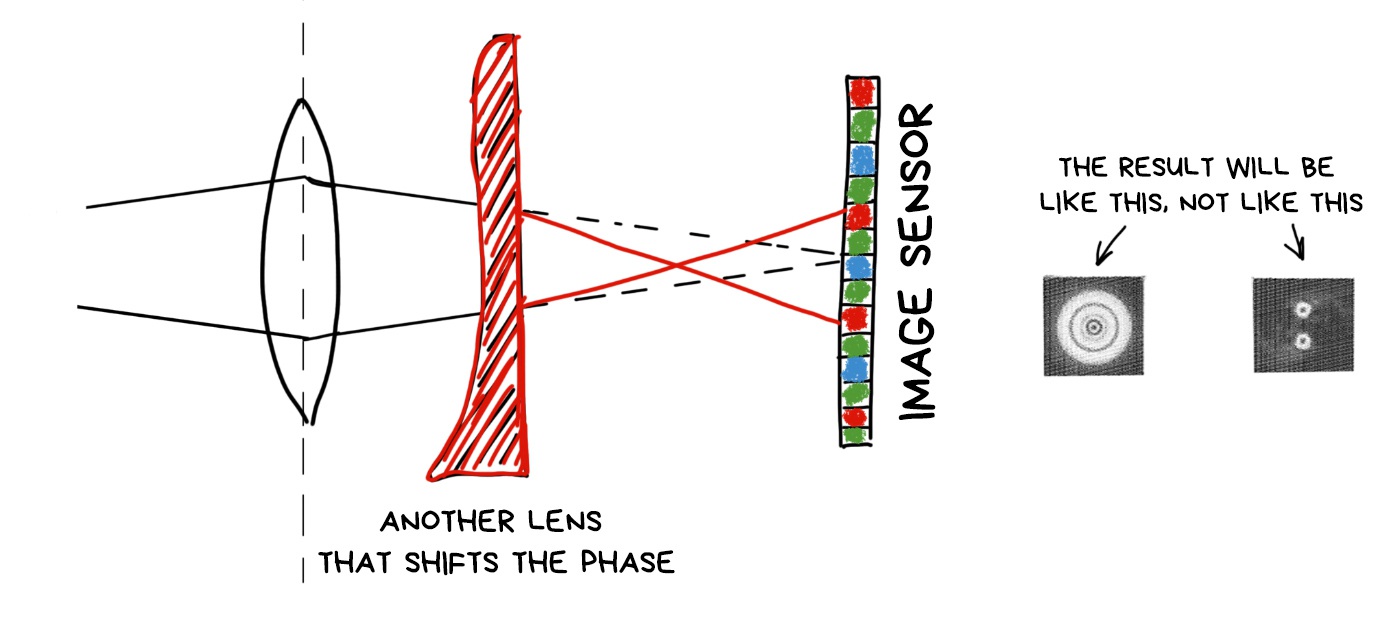
Then everything works like any other optical encoding. Different areas of the image encoded in different ways, and we can algorithmically recognize and fix them somehow. To shift the focus, for example.
What is good about phase coding is that we don't lose brightness. All photons reach the sensor, unlike in the coded aperture, where they bump into impenetrable parts of it (after all in the other half of the standards said that light is a particle).
The bad part is that we will always lose sharpness, as even the utterly focused objects will be smoothly blurred in the sensor, and we will have to call Fourier to gather them together for us. I'll attach the link with more detailed description and examples of photos below.
📝 Computational Optics by Jongmin Baek, 2012
The last thing we can code throughout the path of light to the sensor is the shutter. Instead of usual "open — wait — close" cycle, we will move the shutter several times per shot to result with the desired shutter speed. Sort of as in a multi-exposure, where one shot is exposed several times.
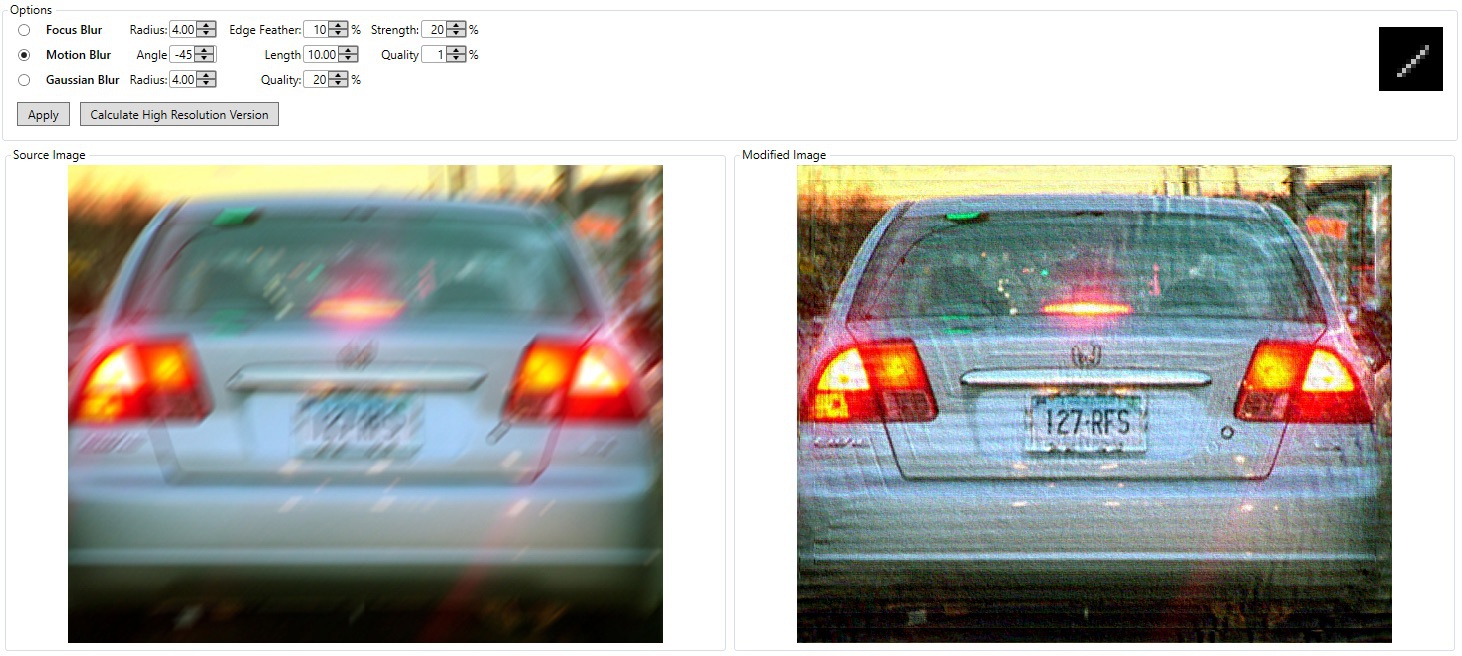
Let's imagine we decided to take pictures of a fast-moving car at night to see its license plate afterward. We don't have a flash, we can't use slow shutter speed, either we'll blur everything. It is necessary to lower the shutter speed, but so we get to a completely black image, and won't recognize the car. What to do?
It also is possible to take this shot in flutter shutter movements, so that the car smear not evenly, but like a "ladder" with a known interval. Thus, we encode the blur with a random sequence of open-close of the shutter, and we can try to decode it with the same inverse convolution. Appears it works much better than trying to get back pixels, evenly blurred with long shutter speed.
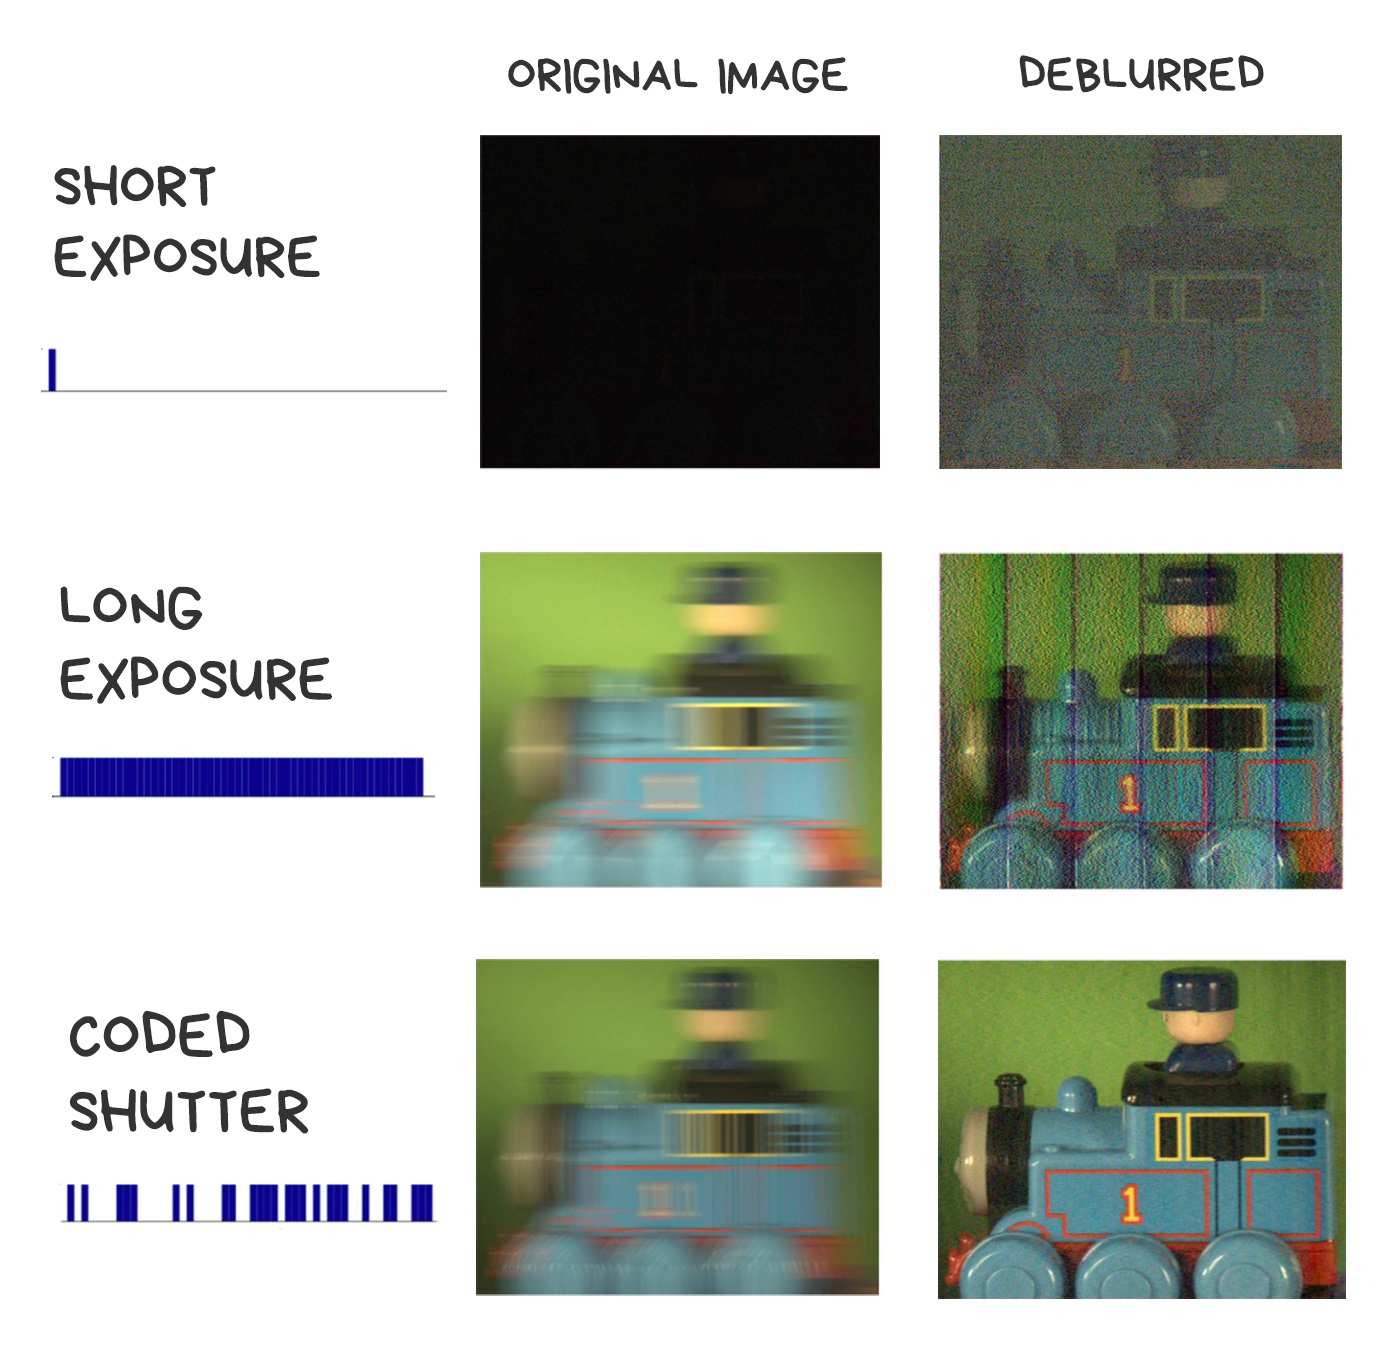
There are several algorithms for that. For the hardcore details, I'll again include links to some smart Indian guys' work.
📝 Coded exposure photography: motion deblurring using fluttered shutter
🎥 Flutter Shutter Coded Filter
Soon we'll go so goddamn crazy, so we'd want to control the lighting after the photo was taken too. To change the cloudy weather to a sunny one, or to change the lights on a model's face after shooting. Now it seems a bit wild, but let's talk again in ten years.
We've already invented a dumb device to control the light — a flash. They have come a long way: from the large lamp boxes that helped avoid the technical limitations of early cameras, to the modern LED flashes that spoil our pictures, so we mainly use them as a flashlight.
It's been a long time since all smartphones switched to Dual LED flashes — a combination of orange and blue LEDs with brightness being adjusted to the color temperature of the shot. In the iPhone, for example, it's called True Tone and controlled by a small piece of code with a hacky formula. Even developers are not allowed to control it.
📝 Demystifying iPhone’s Amber Flashlight

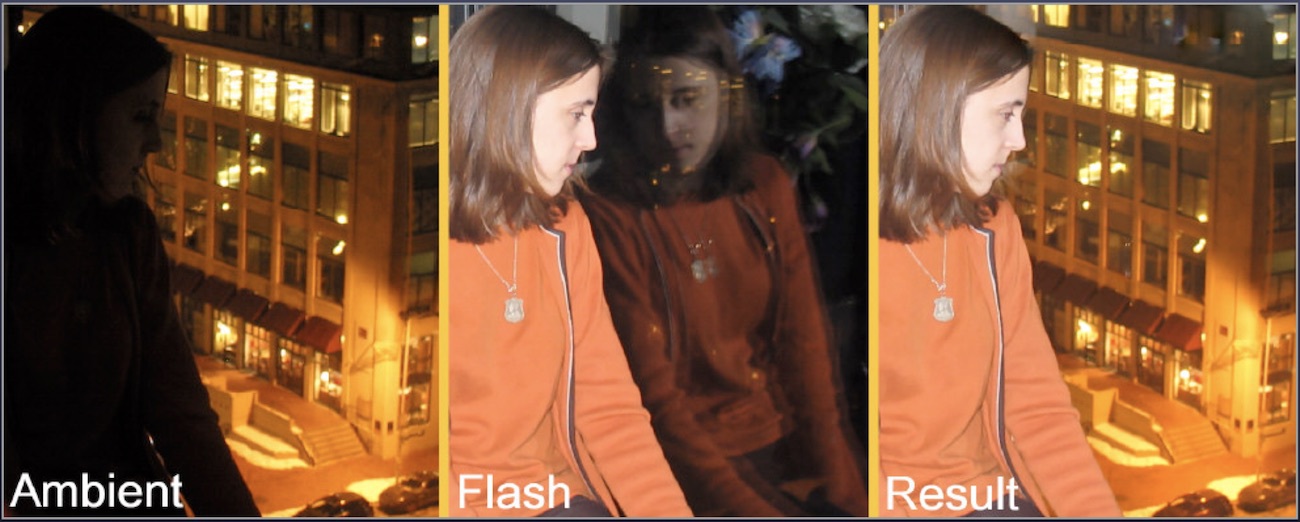
Then we started to think about the problem of all flashes — the overexposed faces and foreground. Everyone did it in their own way. iPhone got Slow Sync Flash, which made camera artificially increase shutter speed in the dark. Google Pixel and other Android smartphones start using their depth sensors to combine images with and without flash, quickly made one by one. The foreground was taken from the photo without the flash when the background remained illuminated.
The further use of a programmable multi-flash is vague. The only interesting application was found in computer vision, where it was used once in assembly scheme (like for Ikea book shelves) to detect the borders of objects more accurately. See the article below.
📝 Non-photorealistic Camera:
Depth Edge Detection and Stylized Rendering using Multi-Flash Imaging
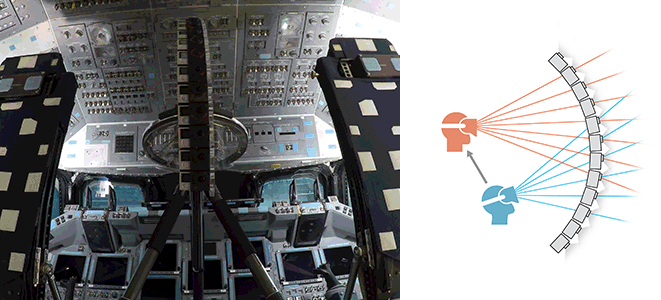
Light is fast. It's always made light coding an easy thing to do. We can change the lighting a hundred times per shot and still not get close to its speed. That's how Lighstage was created back in 2005.
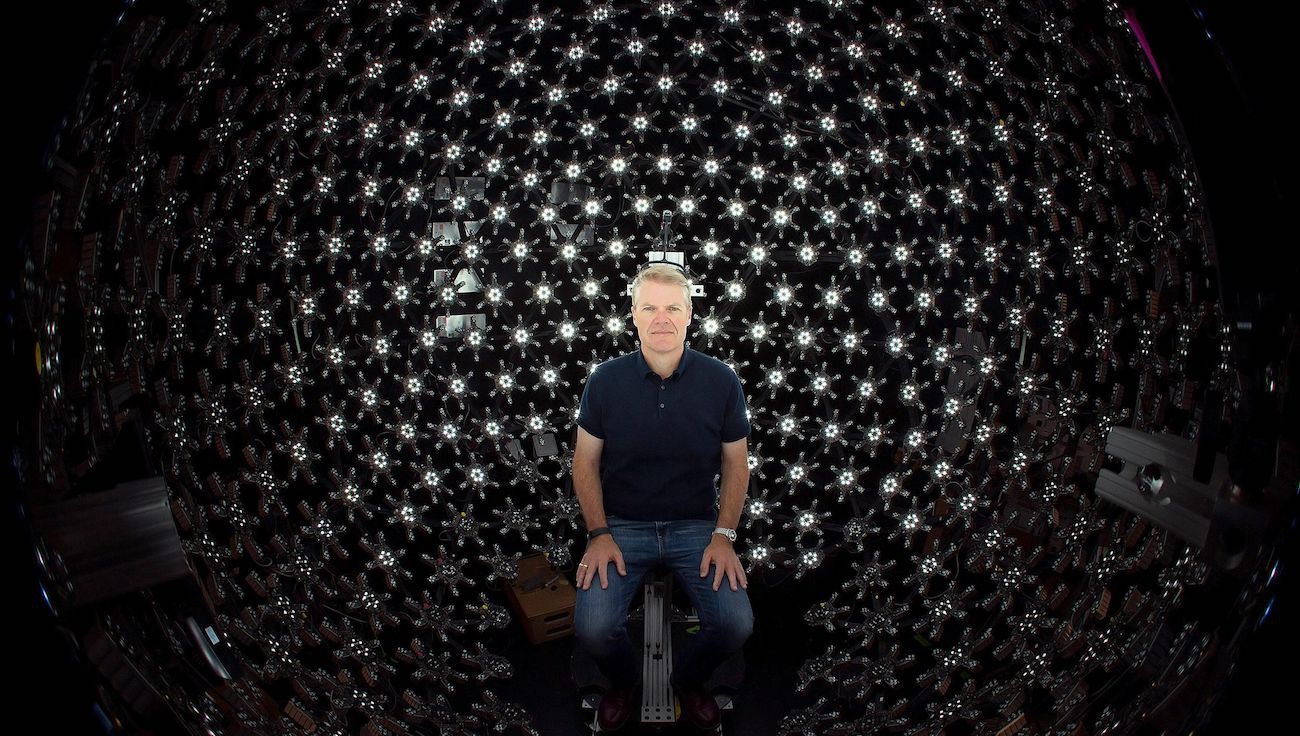
The essence of the method is to highlight the object from all possible angles in each shot of a real 24 fps movie. To get this done, we use 150+ lamps and a high-speed camera that captures hundreds of shots with different lighting conditions per shot.
A similar approach is now used when shooting mixed CGI graphics in movies. It allows you to fully control the lighting of the object in the post-production, placing it in scenes with absolutely random lighting. We just grab the shots illuminated from the required angle, tint them a little, done.

Unfortunately, it's hard to do it on mobile devices, but probably someone will like the idea. I've seen the app from guys who shot a 3D face model, illuminating it with the phone flashlight from different sides.
Lidar is a device that determines the distance to the object. Thanks to a recent hype of self-driving cars, now we can find a cheap lidar on any dumpster. You've probably seen these rotating thingys at their roof? These are lidars.
We still can't fit a laser lidar into a smartphone, but we can go with its younger brother — time-of-flight camera. The idea is ridiculously simple — a special separate camera with an LED-flash above it. The camera measures how quickly the light reaches the objects and creates a depth map of the image.
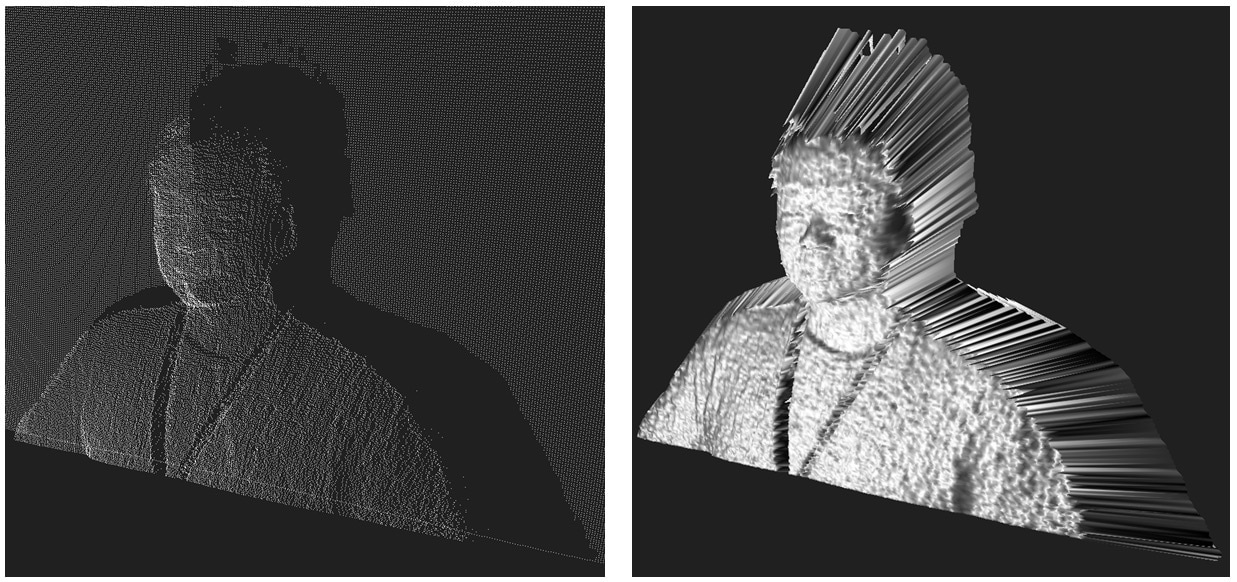
The accuracy of modern ToF cameras is about a centimeter. The latest Samsung and Huawei top models use them to create a bokeh map and for better autofocus in the dark. The latter, by the way, is quite good. I wish everybody had one.
Knowing the exact depth of field will be useful in the coming era of augmented reality. It will be much more accurate and effortless to shoot at the surfaces with lidar to make the first mapping in 3D than analyzing camera images.
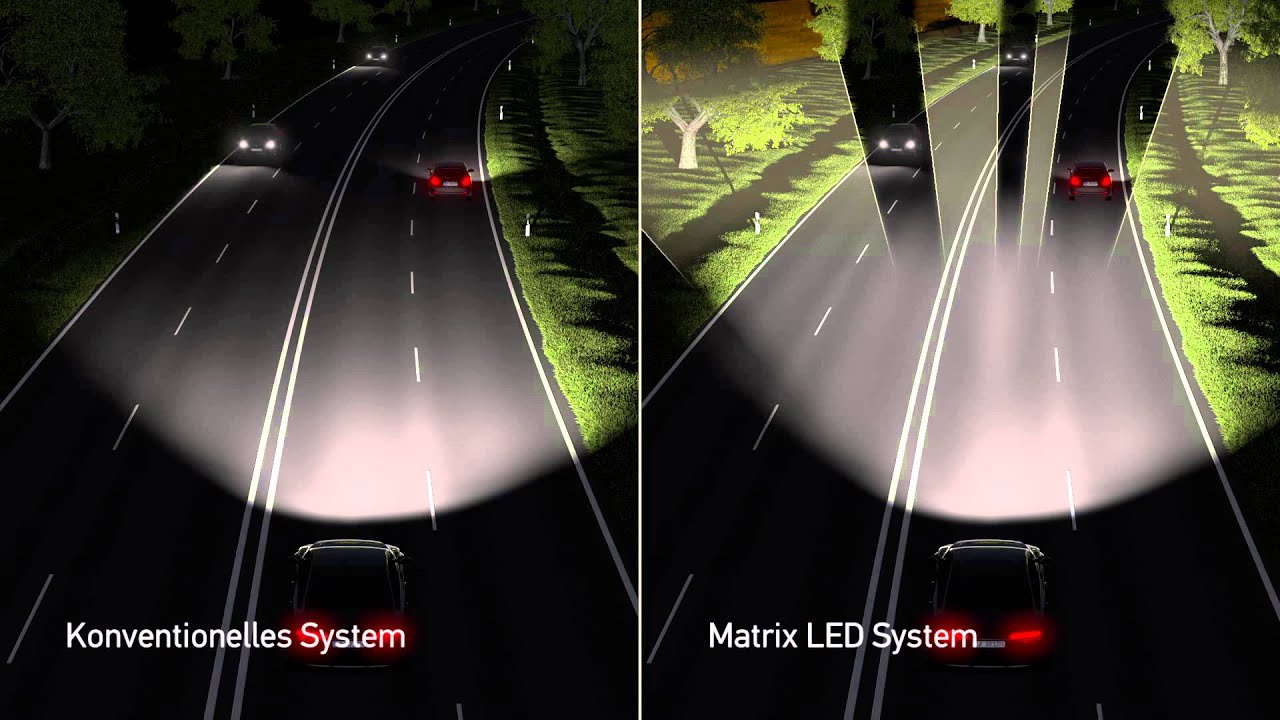
To finally get serious about the computational lighting, we have to switch from regular LED flashes to projectors — devices that can project a 2D picture on a surface. Even a simple monochrome grid will be a good start for smartphones.
The first benefit of the projector is that it can illuminate only the part of the image that needs to be illuminated. No more burnt faces in the foreground. Objects can be recognized and ignored, just like laser headlights of modern car don't blind the oncoming drivers but illuminate pedestrians. Even with the minimum resolution of the projector, such as 100x100 dots, the possibilities are exciting.
The second and more realistic use of the projector is to project an invisible grid on a scene to detect its depth map. With a grid like this, you can safely throw away all your neural networks and lidars. All the distances to the objects in the image now can be calculated with the simplest computer vision algorithms. It was done in Microsoft Kinect times (rest in peace), and it was great.
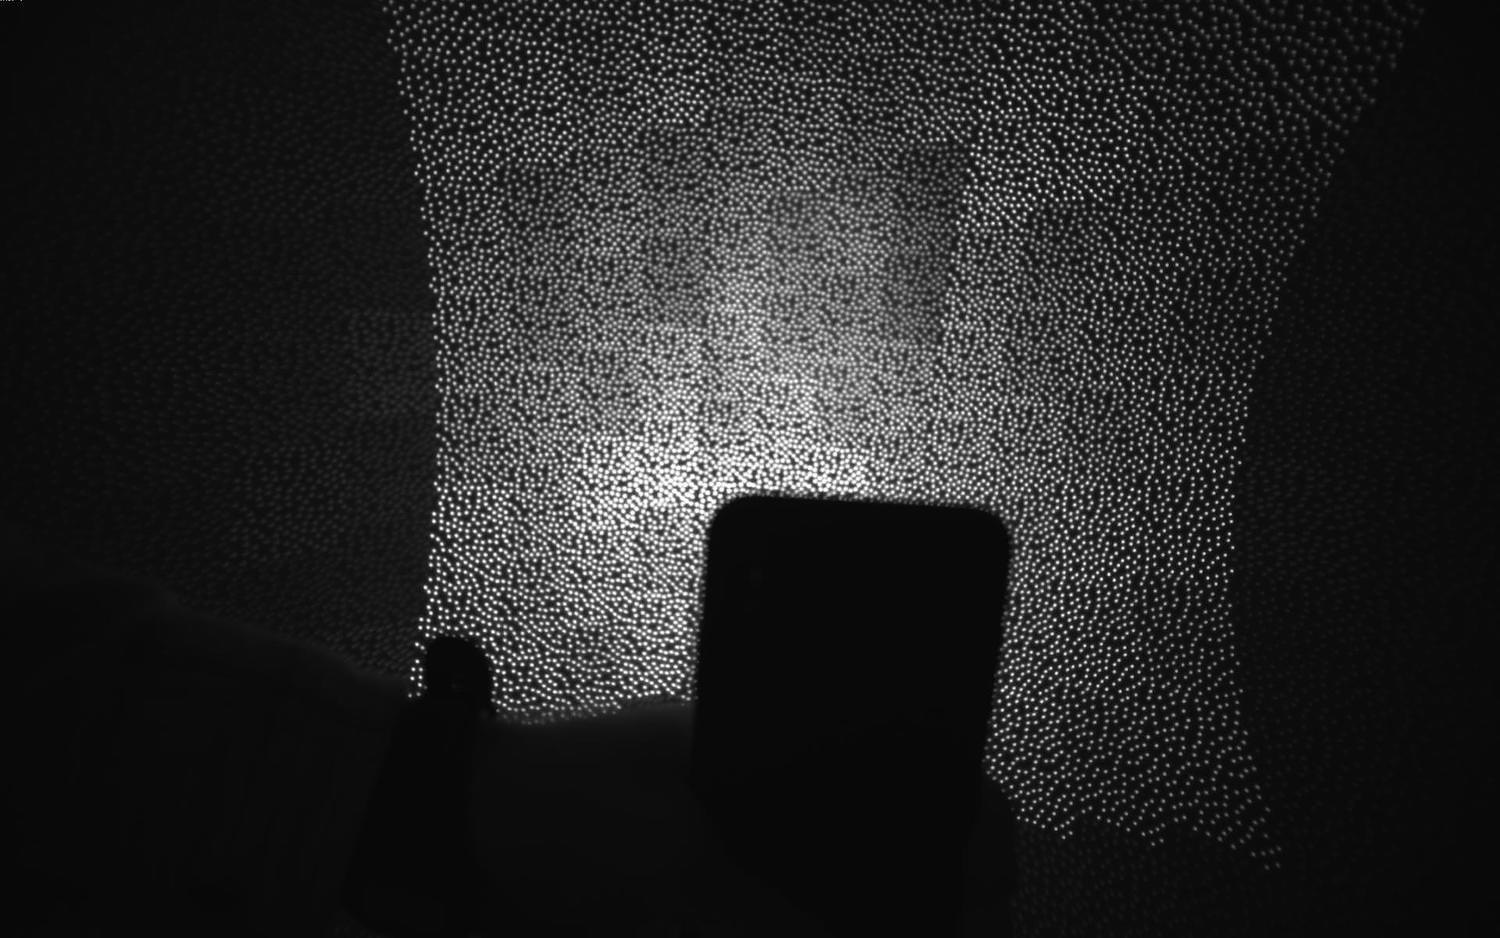
Of course, it's worth to remember here the Dot Projector for Face ID on iPhone X and above. That's our first small step towards projector technology, but quite a noticeable one.
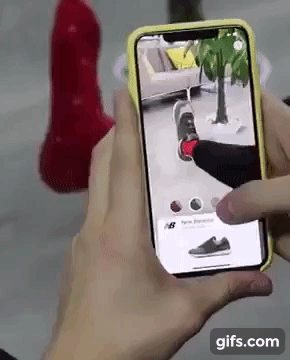
It's time to reflex a bit. Observing what major technology companies are doing, it becomes clear that our next 10 years will be tightly tied to augmented reality. Today AR still looks like a toy to play with 3D wifey, to try on sneakers, to see how the makeup looks, or to train the U.S. Army. Tomorrow we won't even notice we're using it every day. Dense flows of cash in this area are already felt from the Google and Nvidia offices.
For photography, AR means the ability to control the 3D scene. Scan the area, like smartphones with Tango do, add new objects, like in HoloLenz, all such things. Don't worry about the poor graphics of modern AR-apps. As soon as game dev companies invade the area with their battle royales, everything becomes much better than PS4.

Remember that epic fake Moon Mode presented by Huawei? If you missed it: when Huawei camera detects you're going to take a photo of moon, it puts a pre-prepared high-resolution moon picture on top of your photo. Because it looks cooler, indeed! True Chinese cyberpunk.
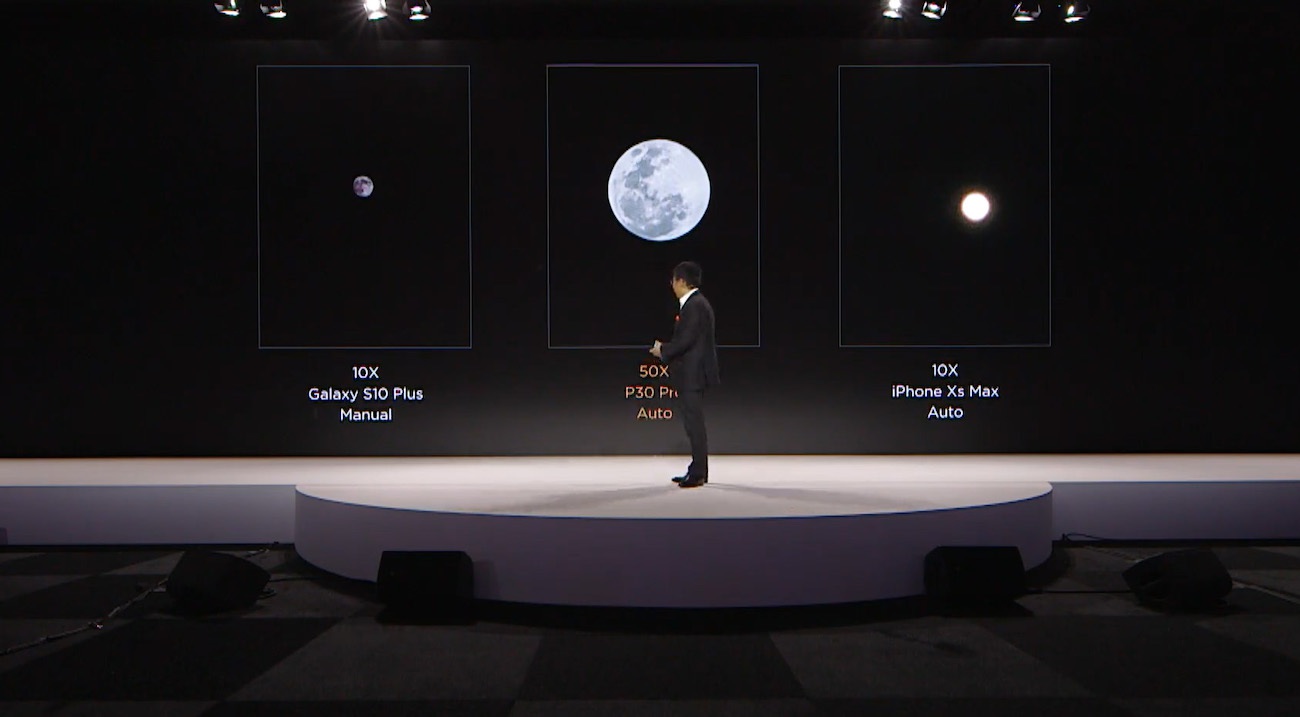
When all the jokes were joked in twitter, I thought about that situation — Huawei gave people exactly what they promised. The moon was real, and the camera lets you shoot it THIS awesome. No deception. Tomorrow, if you give people the opportunity to replace the sky on their photos with beautiful sunsets, half the planet will be amazed.
In the future, machines will be "finishing up" and re-painting our photos for us
Pixel, Galaxy and other Android-phones have some stupid AR-mode today. Some let you add cartoon characters to take photos with them, others spread emojis all over the room, or put a mask on your face just like in a Snapchat.
These are just our first naive steps. Today, Google camera has Google Lens, that finds information about any object you point your camera at. Samsung does the same with Bixby. For now, these tricks are only made to humiliate the iPhone users, but it's easy to imagine the next time you're taking a pic with the Eiffel Tower, your phone says: you know, your selfie is shit. I'll put a nice sharp picture of the tower in the background, fix your hair, and remove a pimple above your lip. If you plan to post it to Instagram, VSCO L4 filter will work the best for it. You're welcome, leather bastard.
After a while, the camera will start to replace the grass with greener one, your friends with better ones, and boobs with bigger ones. Or something like that. A brave new world.
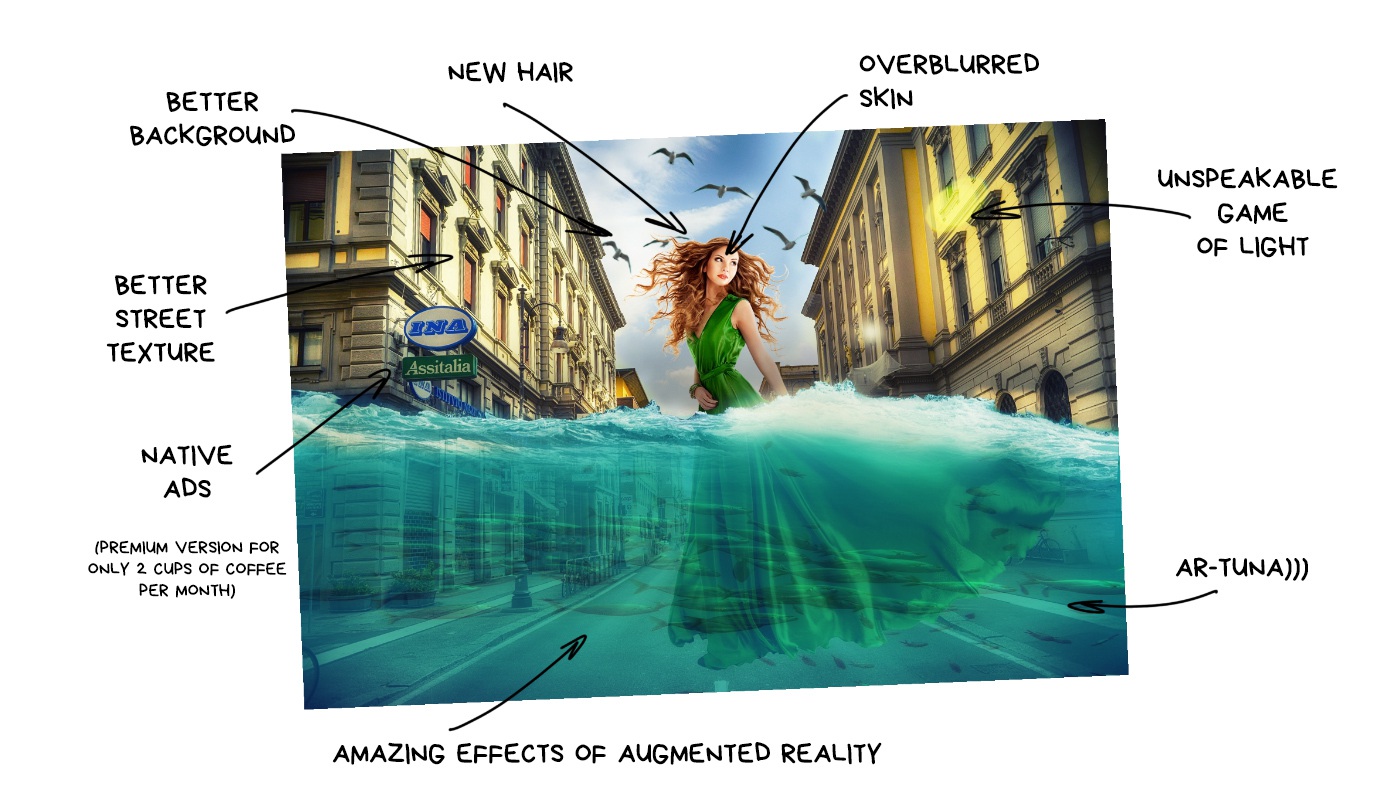
In the beginning it's gonna look ridiculous. Probably even terrible. The photo-aesthetes will be enraged, the fighters for natural beauty will launch a company to ban neural networks usage, but the mass audience will be delighted.
Because photography always was just a way to express and share emotions. Every time there is a tool to express more vividly and effectively, everyone starts using it — emoji, filters, stickers, masks, audio messages. Some will already find the list disgusting, but it can be easily continued.
Photos of the "objective reality" will seem as boring as your great-grandmother's pictures on the chair. They won't die but become something like paper books or vinyl records — a passion of enthusiasts, who see a special deep meaning in it. "Who cares of setting up the lighting and composition when my phone can do the same". That's our future. Sorry.
The mass audience doesn't give a shit about objectivity. It needs algorithms to make their faces younger, and vacations cooler than their coworker or neighbor. The augmented reality will re-draw the reality for them, even with a higher level of detail than it really is. It may sound funny, but we'll start to improve the graphics in the real world.
And yes, as it always does, it all starts with teenagers with their "strange, stupid hobbies for idiots". That's what happens all the time. When you stop understanding something — this IS the future.
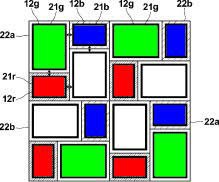
It is hard to legibly compare the differences in modern smartphone cameras, as due to the huge competition in the market, everyone implements the new features almost simultaneously. There's no way to be objective in the world where Google announces a new Night Mode, then Samsung and Xiaomi just copy it in a new firmware after a month. So I'm not gonna even try to be objective here.
In the pictures below, I briefly described the main features that I found interesting (in the context of this article) — ignoring the most obvious things like Dual LED flashes, automatic white balance, or panorama mode. In the next section, you can share your insights about your favorite smartphone. Crowdsourcing!
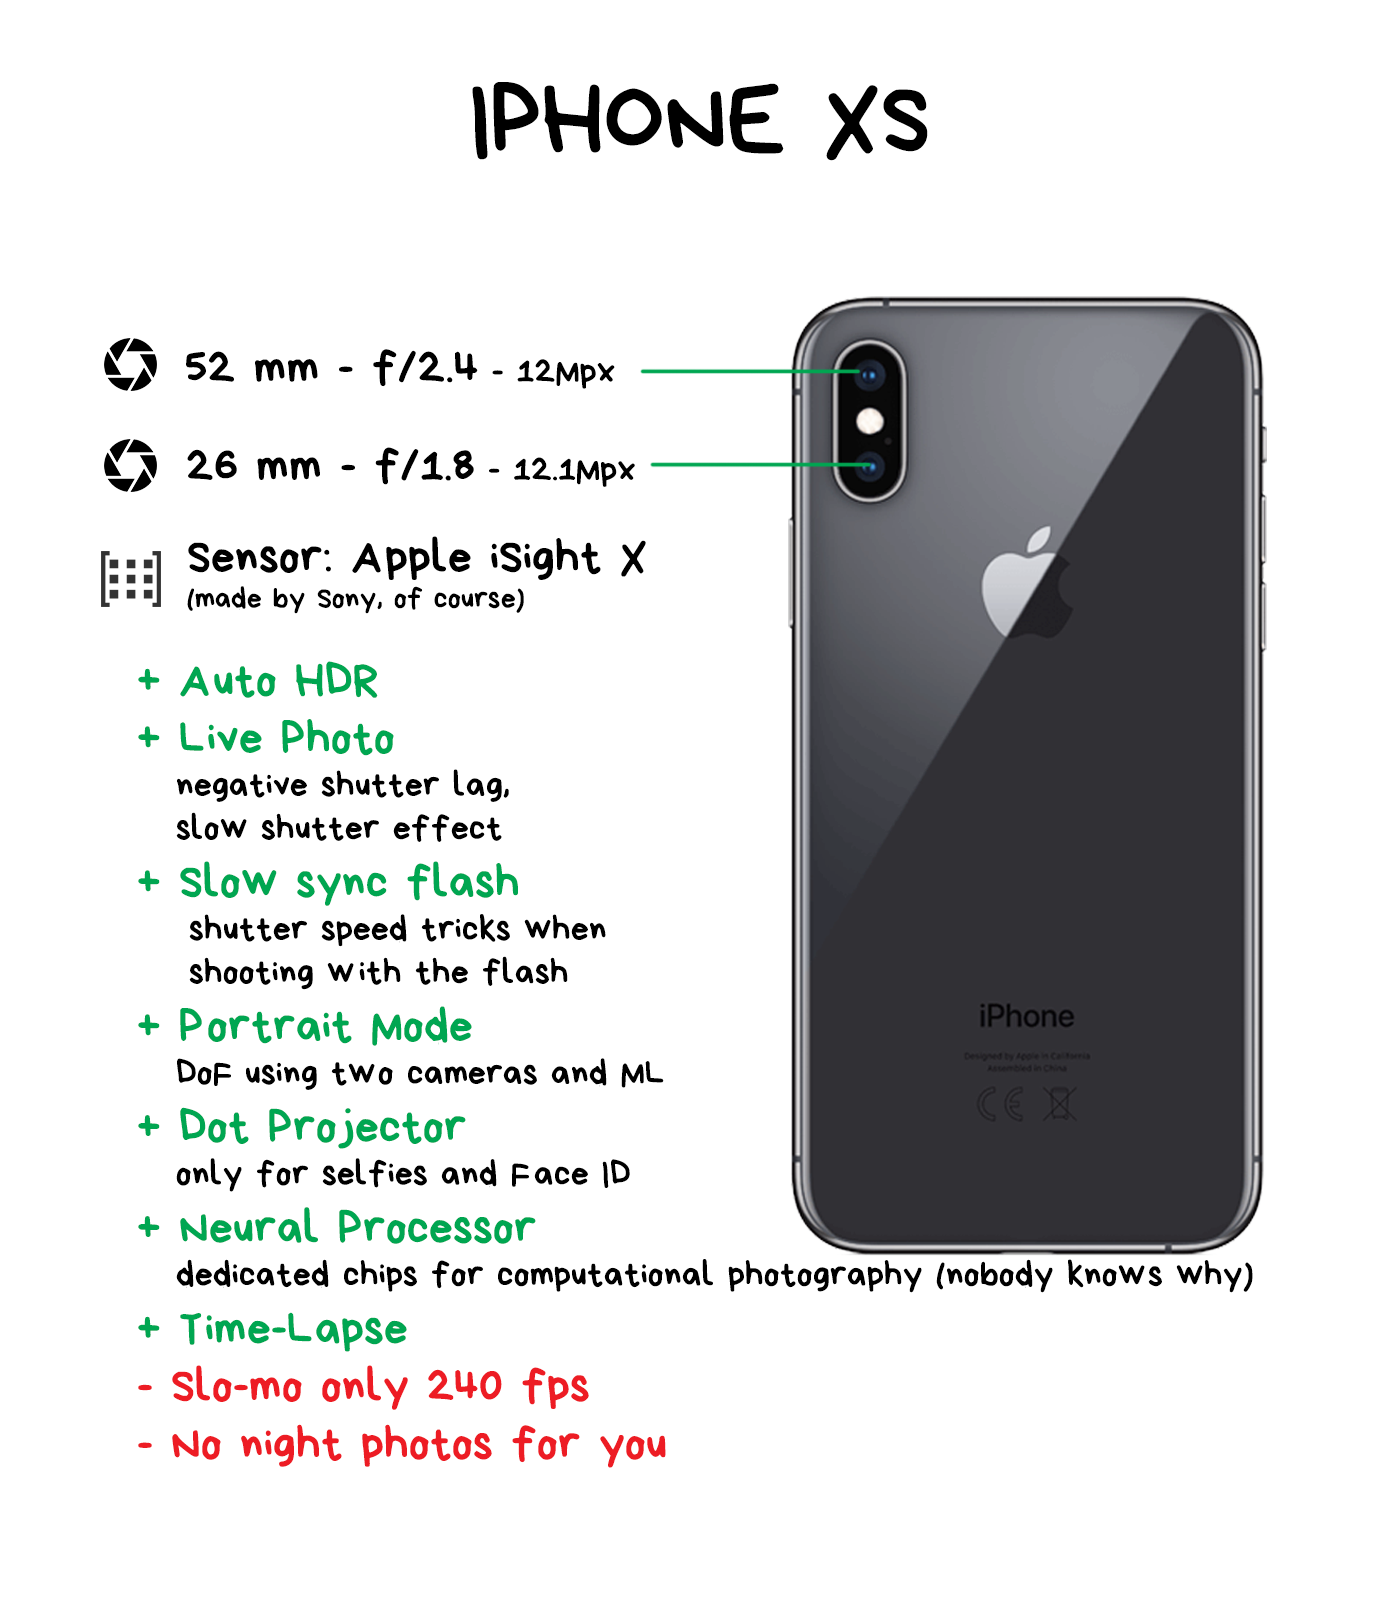
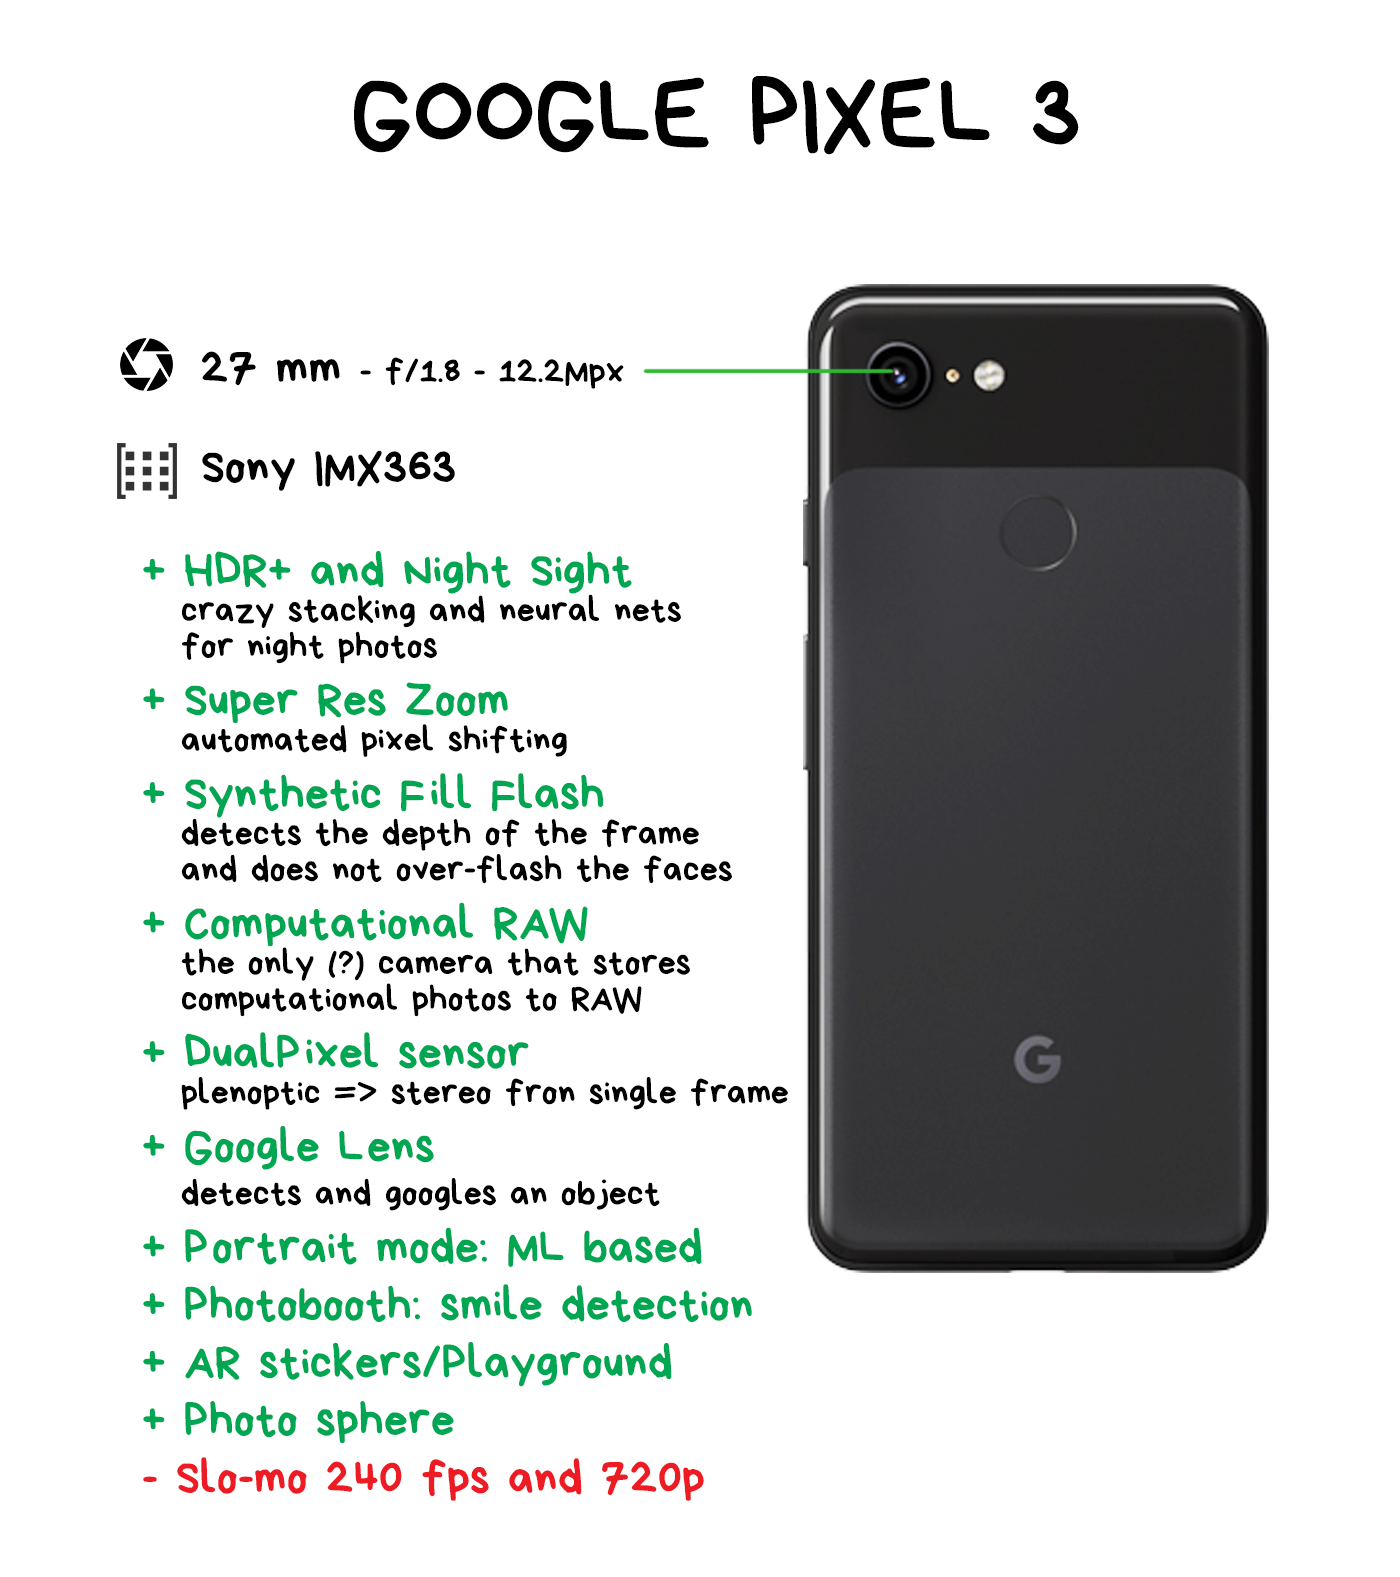
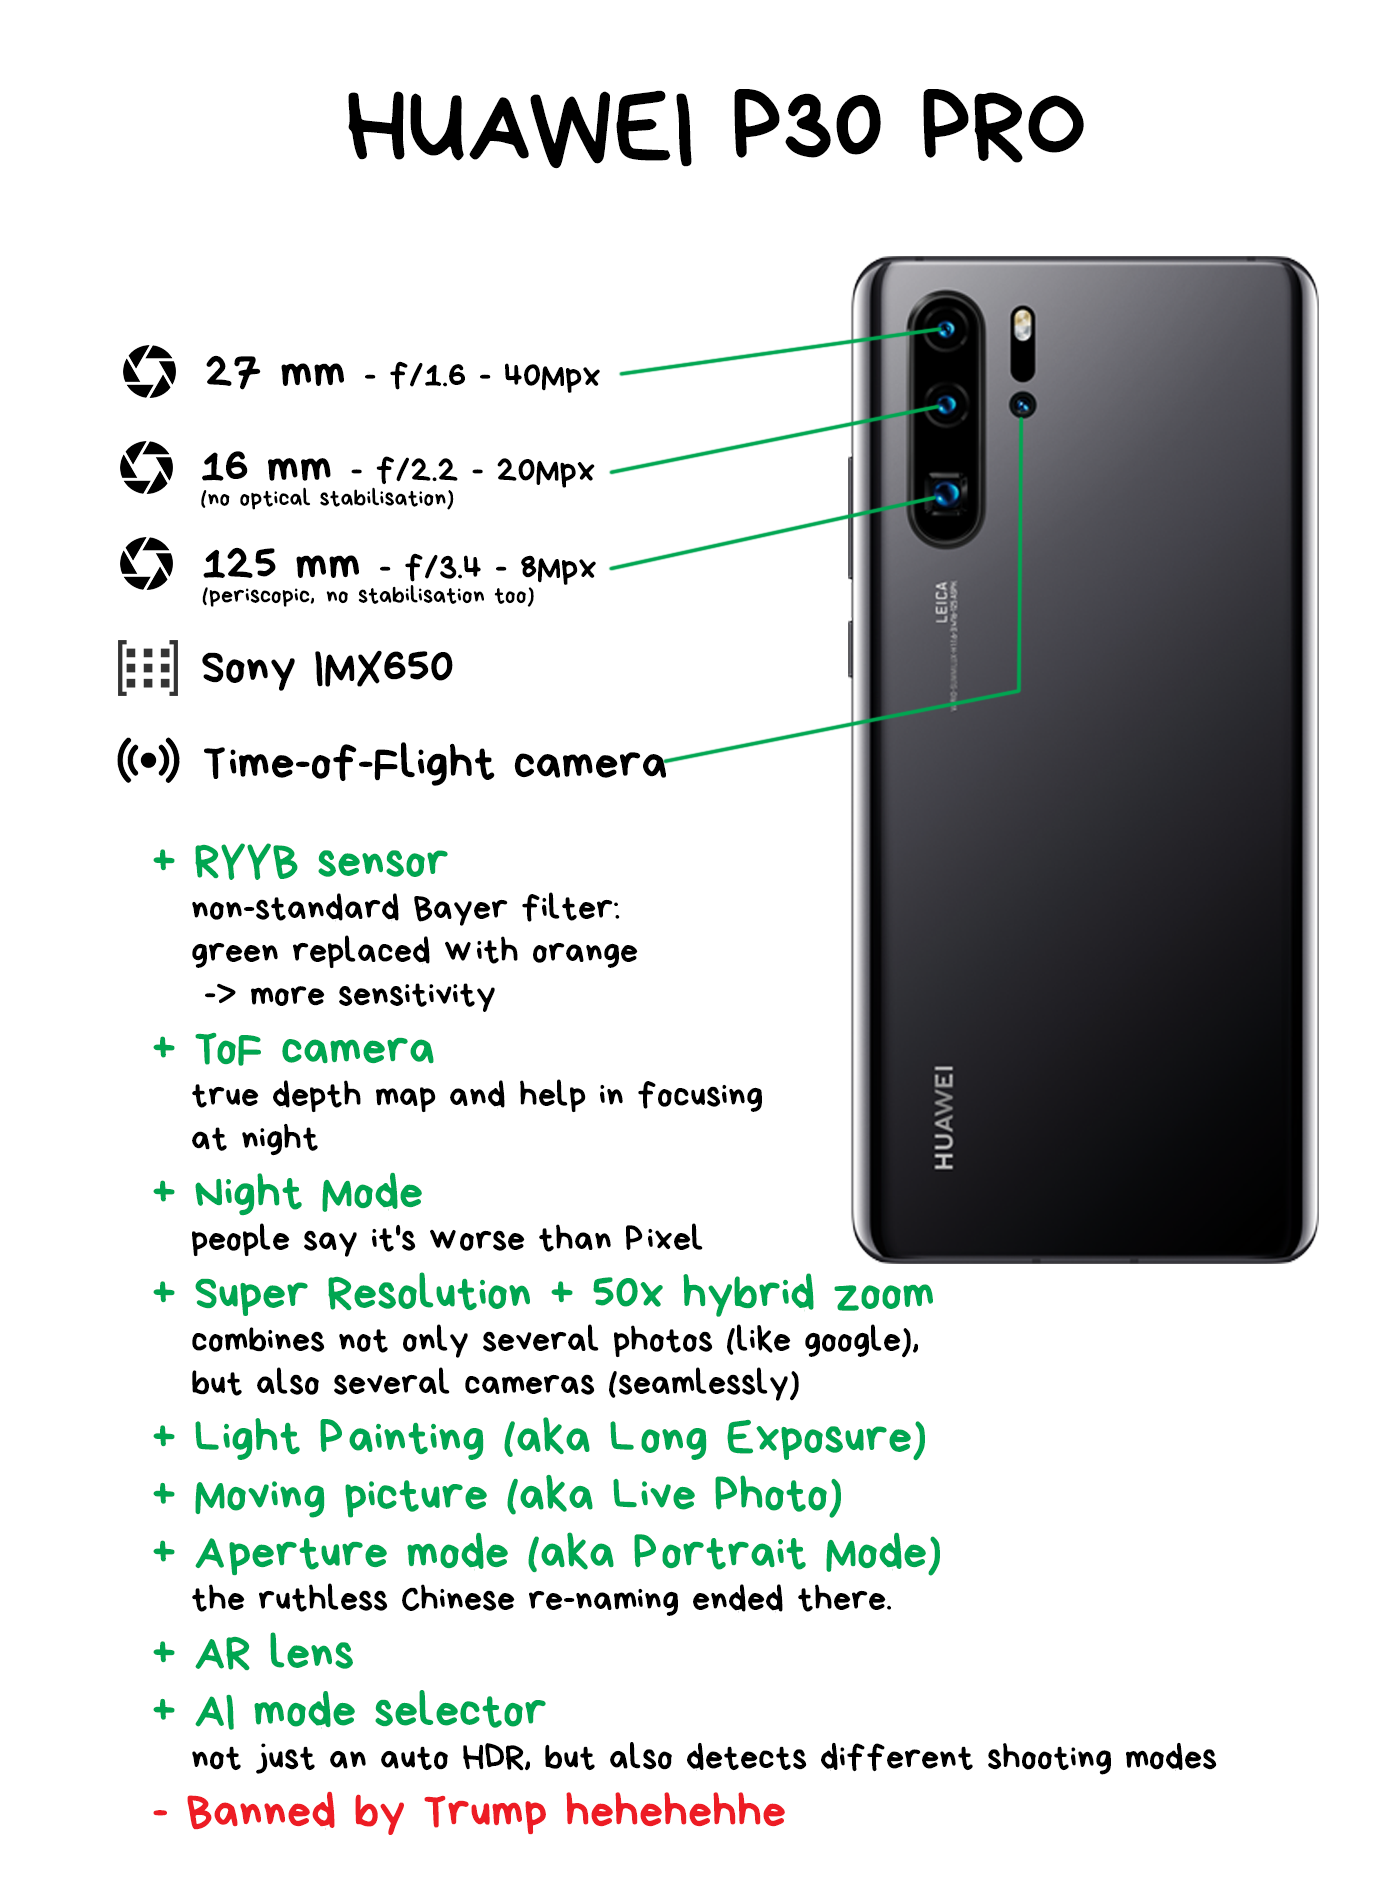
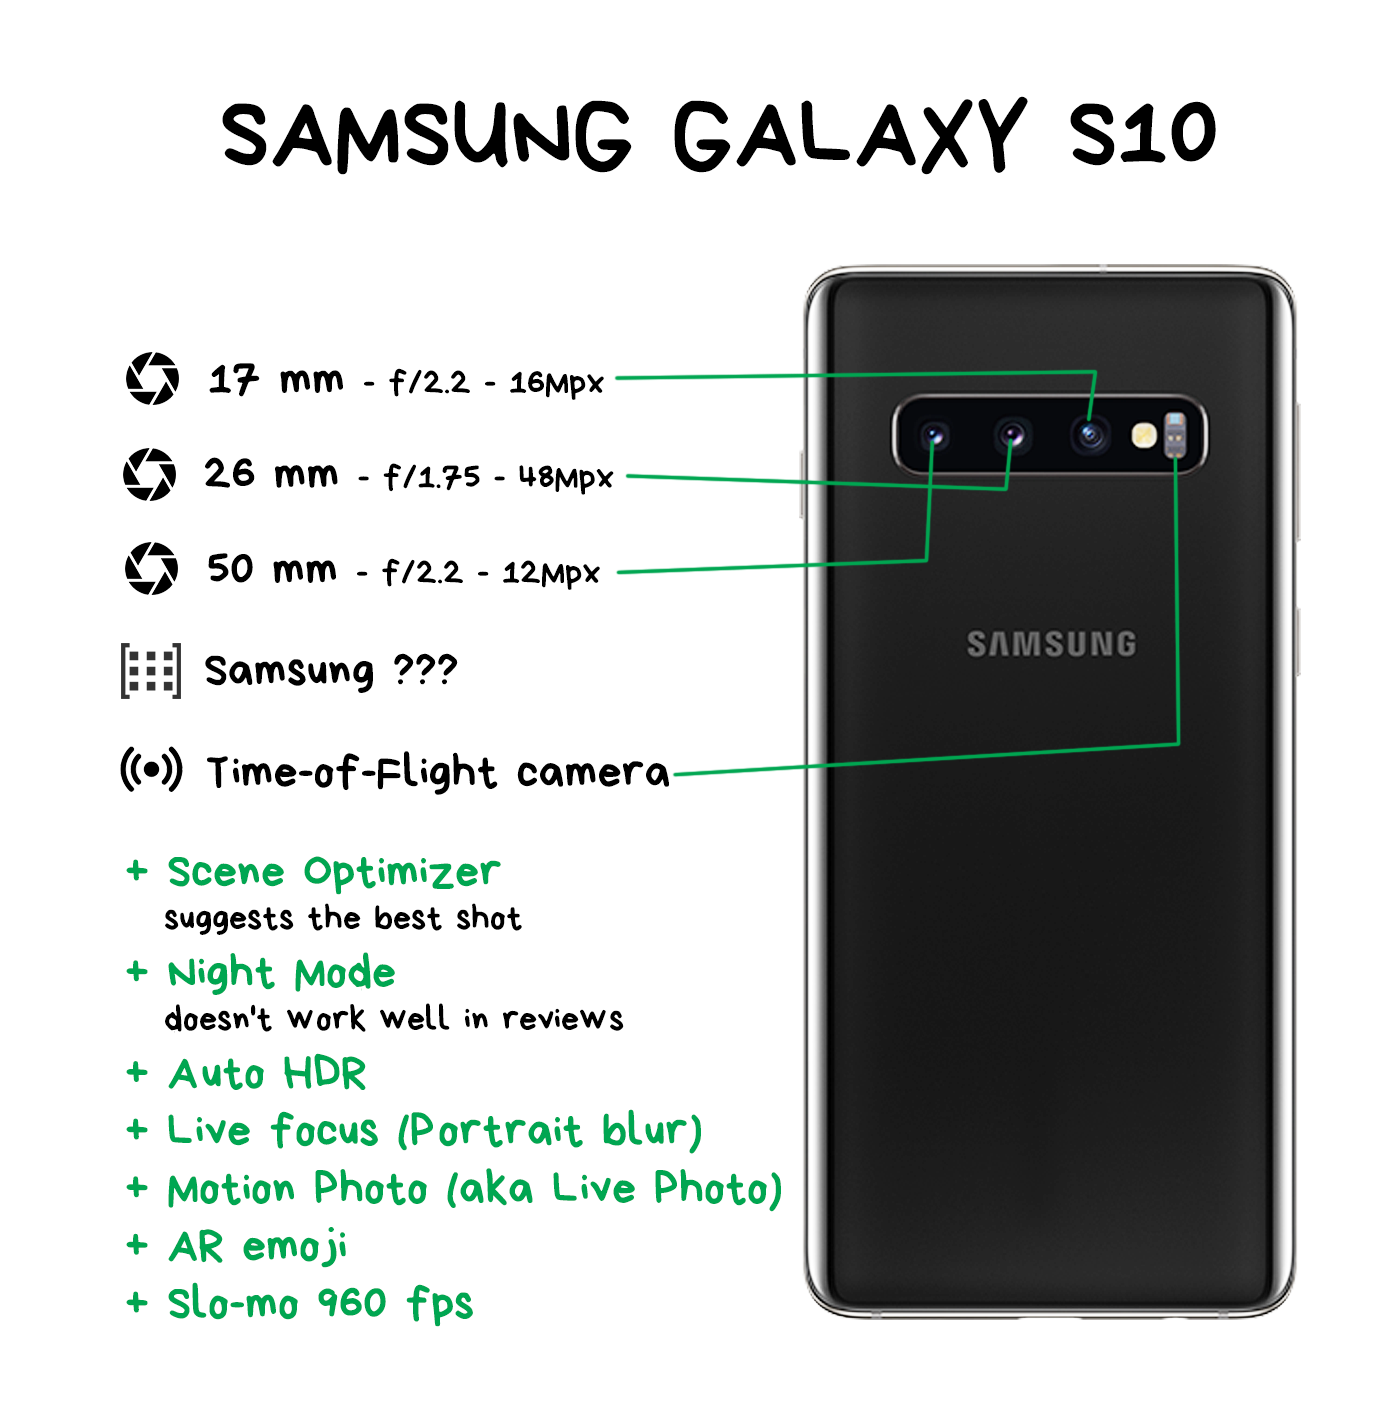
For this comparison, I only took four phones that I tested myself. Of course, there are thousands more in the world. If you have or had an interesting phone, please tell us a few words about its camera and your experience below in comments.
Throughout history, each human technology becomes more advanced as soon as it stops copying living organisms. Today, it is hard to imagine a car with joints and muscles instead of wheels. Planes with fixed wings fly 800+ km/h — birds don't even try. There are no analogs to the computer processor in nature at all.
The most exciting part of the list is what's not in it. Camera sensors. We still haven't figured out anything better than imitating the eye structure. The same crystalline lens and a set of RGGB-cones as retina has.
Computational photography has added a "brain" to this process. A processor that handles visual information not only by reading pixels through the optic nerve but also by complementing the picture based on its experience. Yes, it opens up a lot of possibilities for us today, but there is a hunch we're still trying to wave with hand-made wings instead of inventing a plane. One that will leave behind all these shutters, apertures, and Bayer filters.
The beauty of the situation is that we can't even imagine today what it's going to be.
Most of us will even die without knowing.
And it's wonderful.